在Ubuntu 上启用普联 tp-link TL-WDN3321 300M双频无线USB网卡 

话说这款网卡买了好久,由于采用的是台湾 ralink tek 的芯片,而该废品厂家一直没有发布一款linux下可用的驱动。

从而导致了包括tp-link在内采用其RT5572芯片的无线网卡均不可用于GNU/Linux。

这让我们这些GNU/Linux 爱好者苦恼至极。

期间也曾经去ralink(http://www.mediatek.com/_en/07_downloads/01_windows.php?sn=501)下载过其提供的所谓 "for linux" 的驱动,结果不是假死就是没反应。

后来我一度放弃了,就转用了一段Windows 8.

直到昨天我订阅的在launchpad.net 的关于 Ralink rt5572 芯片无驱动的bug(https://bugs.launchpad.net/ubuntu/+source/linux/+bug/1020650) 收到了一位开发者的回复。

他指出,最新的Ubuntu 13.10 内核已经确认包含ralink rt5572 的驱动,不过由于距离13.10 发布尚有时日,他便提供了ubuntu kernel team 放出适用于13.10 的3.10内核包。

地址:http://kernel.ubuntu.com/~kernel-ppa/mainline/v3.10-saucy/

听到这个消息,我顿时来了精神。

火速下载,安装。

由于我是x64的系统,故而下载了:
http://kernel.ubuntu.com/~kernel-ppa/ma ... _amd64.deb
http://kernel.ubuntu.com/~kernel-ppa/ma ... 35_all.deb
http://kernel.ubuntu.com/~kernel-ppa/ma ... _amd64.deb

三个deb包。

进去ubuntu,安装:

sharl@sharl-desktop:~/下载$ ll
总用量 58012
drwxr-xr-x 3 sharl sharl 4096 7月 14 12:09 ./
drwxr-xr-x 28 sharl sharl 4096 7月 14 12:09 ../
drwx------ 5 sharl sharl 4096 5月 2 15:36 bt/
-rw------- 1 sharl sharl 12526754 7月 14 11:15 linux-headers-3.10.0-031000_3.10.0-031000.201306301935_all.deb
-rw------- 1 sharl sharl 994270 7月 14 11:12 linux-headers-3.10.0-031000-generic_3.10.0-031000.201306301935_amd64.deb
-rw------- 1 sharl sharl 45866544 6月 30 23:42 linux-image-3.10.0-031000-generic_3.10.0-031000.201306301935_amd64.deb
sharl@sharl-desktop:~/下载$ sudo dpkg -i linux-headers-3.10.0-031000_3.10.0-031000.201306301935_all.deb
Selecting previously unselected package linux-headers-3.10.0-031000.
(正在读取数据库 ... 系统当前共安装有 182756 个文件和目录。)
正在解压缩 linux-headers-3.10.0-031000 (从 linux-headers-3.10.0-031000_3.10.0-031000.201306301935_all.deb) ...
正在设置 linux-headers-3.10.0-031000 (3.10.0-031000.201306301935) ...
sharl@sharl-desktop:~/下载$ sudo dpkg -i linux-headers-3.10.0-031000-generic_3.10.0-031000.201306301935_amd64.deb
(正在读取数据库 ... 系统当前共安装有 197770 个文件和目录。)
正预备替换 linux-headers-3.10.0-031000-generic 3.10.0-031000.201306301935 (使用 linux-headers-3.10.0-031000-generic_3.10.0-031000.201306301935_amd64.deb) ...
正在解压缩将用于更替的包文件 linux-headers-3.10.0-031000-generic ...
正在设置 linux-headers-3.10.0-031000-generic (3.10.0-031000.201306301935) ...
Examining /etc/kernel/header_postinst.d.
run-parts: executing /etc/kernel/header_postinst.d/dkms 3.10.0-031000-generic /boot/vmlinuz-3.10.0-031000-generic
sharl@sharl-desktop:~/下载$ sudo dpkg -i linux-image-3.10.0-031000-generic_3.10.0-031000.201306301935_amd64.deb
Selecting previously unselected package linux-image-3.10.0-031000-generic.
(正在读取数据库 ... 系统当前共安装有 197770 个文件和目录。)
正在解压缩 linux-image-3.10.0-031000-generic (从 linux-image-3.10.0-031000-generic_3.10.0-031000.201306301935_amd64.deb) ...
Done.
正在设置 linux-image-3.10.0-031000-generic (3.10.0-031000.201306301935) ...
Running depmod.
update-initramfs: deferring update (hook will be called later)
Examining /etc/kernel/postinst.d.
run-parts: executing /etc/kernel/postinst.d/apt-auto-removal 3.10.0-031000-generic /boot/vmlinuz-3.10.0-031000-generic
run-parts: executing /etc/kernel/postinst.d/dkms 3.10.0-031000-generic /boot/vmlinuz-3.10.0-031000-generic
run-parts: executing /etc/kernel/postinst.d/initramfs-tools 3.10.0-031000-generic /boot/vmlinuz-3.10.0-031000-generic
update-initramfs: Generating /boot/initrd.img-3.10.0-031000-generic
run-parts: executing /etc/kernel/postinst.d/pm-utils 3.10.0-031000-generic /boot/vmlinuz-3.10.0-031000-generic
run-parts: executing /etc/kernel/postinst.d/update-notifier 3.10.0-031000-generic /boot/vmlinuz-3.10.0-031000-generic
run-parts: executing /etc/kernel/postinst.d/zz-update-grub 3.10.0-031000-generic /boot/vmlinuz-3.10.0-031000-generic
Generating grub.cfg ...
Found linux image: /boot/vmlinuz-3.10.0-031000-generic
Found initrd image: /boot/initrd.img-3.10.0-031000-generic
Found linux image: /boot/vmlinuz-3.8.0-19-generic
Found initrd image: /boot/initrd.img-3.8.0-19-generic
Found memtest86+ image: /boot/memtest86+.bin
Found Windows 8 (loader) on /dev/sda2
done


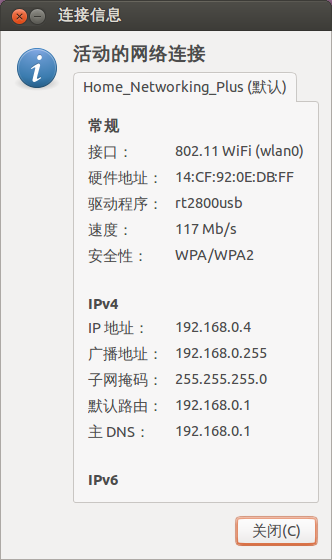
安装重启,果然tp-link tl-wdn3321 无线网卡复活了。如图:


附新内核与旧内核的数据比较:
旧内核:

sharl@sharl-desktop:~$ uname -a
Linux sharl-desktop 3.8.0-19-generic #30-Ubuntu SMP Wed May 1 16:35:23 UTC 2013 x86_64 x86_64 x86_64 GNU/Linux
sharl@sharl-desktop:~$ lsusb
Bus 001 Device 002: ID 8087:0024 Intel Corp. Integrated Rate Matching Hub
Bus 002 Device 002: ID 8087:0024 Intel Corp. Integrated Rate Matching Hub
Bus 001 Device 001: ID 1d6b:0002 Linux Foundation 2.0 root hub
Bus 002 Device 001: ID 1d6b:0002 Linux Foundation 2.0 root hub
Bus 002 Device 003: ID 05e3:0608 Genesys Logic, Inc. USB-2.0 4-Port HUB
Bus 002 Device 004: ID 0ac8:303b Z-Star Microelectronics Corp. ZC0303 Webcam
Bus 002 Device 005: ID 0bc2:3300 Seagate RSS LLC
Bus 002 Device 006: ID 046d:c52e Logitech, Inc.
Bus 002 Device 007: ID 062a:8668 Creative Labs
Bus 002 Device 008: ID 1a1d:8301 Veho
Bus 002 Device 009: ID 148f:5572 Ralink Technology, Corp.
sharl@sharl-desktop:~$ ifconfig -a
eth0 Link encap:以太网 硬件地址 18:03:73:cc:86:50
UP BROADCAST MULTICAST MTU:1500 跃点数:1
接收数据包:0 错误:0 丢弃:0 过载:0 帧数:0
发送数据包:0 错误:0 丢弃:0 过载:0 载波:0
碰撞:0 发送队列长度:1000
接收字节:0 (0.0 B) 发送字节:0 (0.0 B)
中断:20 Memory:e1a00000-e1a20000

lo Link encap:本地环回
inet 地址:127.0.0.1 掩码:255.0.0.0
inet6 地址: ::1/128 Scope:Host
UP LOOPBACK RUNNING MTU:65536 跃点数:1
接收数据包:320 错误:0 丢弃:0 过载:0 帧数:0
发送数据包:320 错误:0 丢弃:0 过载:0 载波:0
碰撞:0 发送队列长度:0
接收字节:25280 (25.2 KB) 发送字节:25280 (25.2 KB)


新内核:

sharl@sharl-desktop:~$ uname -a
Linux sharl-desktop 3.10.0-031000-generic #201306301935 SMP Sun Jun 30 23:36:16 UTC 2013 x86_64 x86_64 x86_64 GNU/Linux
sharl@sharl-desktop:~$ lsusb
Bus 001 Device 002: ID 8087:0024 Intel Corp. Integrated Rate Matching Hub
Bus 002 Device 002: ID 8087:0024 Intel Corp. Integrated Rate Matching Hub
Bus 001 Device 001: ID 1d6b:0002 Linux Foundation 2.0 root hub
Bus 002 Device 001: ID 1d6b:0002 Linux Foundation 2.0 root hub
Bus 002 Device 003: ID 05e3:0608 Genesys Logic, Inc. USB-2.0 4-Port HUB
Bus 002 Device 004: ID 0ac8:303b Z-Star Microelectronics Corp. ZC0303 Webcam
Bus 002 Device 005: ID 0bc2:3300 Seagate RSS LLC
Bus 002 Device 006: ID 046d:c52e Logitech, Inc.
Bus 002 Device 007: ID 062a:8668 Creative Labs
Bus 002 Device 008: ID 1a1d:8301 Veho
Bus 002 Device 009: ID 148f:5572 Ralink Technology, Corp.
sharl@sharl-desktop:~$ ifconfig
eth0 Link encap:以太网 硬件地址 18:03:73:cc:86:50
UP BROADCAST MULTICAST MTU:1500 跃点数:1
接收数据包:0 错误:0 丢弃:0 过载:0 帧数:0
发送数据包:0 错误:0 丢弃:0 过载:0 载波:0
碰撞:0 发送队列长度:1000
接收字节:0 (0.0 B) 发送字节:0 (0.0 B)
中断:20 Memory:e1a00000-e1a20000

lo Link encap:本地环回
inet 地址:127.0.0.1 掩码:255.0.0.0
inet6 地址: ::1/128 Scope:Host
UP LOOPBACK RUNNING MTU:65536 跃点数:1
接收数据包:140 错误:0 丢弃:0 过载:0 帧数:0
发送数据包:140 错误:0 丢弃:0 过载:0 载波:0
碰撞:0 发送队列长度:0
接收字节:10844 (10.8 KB) 发送字节:10844 (10.8 KB)

wlan0 Link encap:以太网 硬件地址 14:cf:92:0e:db:ff
inet 地址:192.168.0.4 广播:192.168.0.255 掩码:255.255.255.0
inet6 地址: fe80::16cf:92ff:fe0e:dbff/64 Scope:Link
UP BROADCAST RUNNING MULTICAST MTU:1500 跃点数:1
接收数据包:64 错误:0 丢弃:0 过载:0 帧数:0
发送数据包:113 错误:0 丢弃:0 过载:0 载波:0
碰撞:0 发送队列长度:1000
接收字节:16650 (16.6 KB) 发送字节:16987 (16.9 KB)

[ ] ( 6015 次浏览 ) 永久链接 ( 3 / 2474 )
VPS 折腾全记录-part 4 

好了,值得庆贺的是,本篇是这次中篇连载记录手稿的最后一集了。

:-)

太棒了。

现在就剩下 lighttpd 和 nginx 这两台 http server 了。

先是lighttpd,解压,进入目录:
我的configure:

[root@PowerPC lighttpd-1.4.32]# ./configure \
> --prefix=/opt/lighttpd \
> --disable-lfs \
> --disable-ipv6 \
> --with-mysql=/opt/mysql/bin/mysql_config \
> --with-attr \
> --with-pcre \
> --with-zlib \
> --with-bzip2 \
> --with-fam


检查依赖,没有任何问题。下面是编译程序给出的概况:

Plugins:

enabled:
mod_access
mod_accesslog
mod_alias
mod_auth
mod_cgi
mod_compress
mod_dirlisting
mod_evhost
mod_expire
mod_extforward
mod_fastcgi
mod_flv_streaming
mod_indexfile
mod_mysql_vhost
mod_proxy
mod_redirect
mod_rewrite
mod_rrdtool
mod_scgi
mod_secdownload
mod_setenv
mod_simple_vhost
mod_ssi
mod_staticfile
mod_status
mod_trigger_b4_dl
mod_userdir
mod_usertrack
mod_webdav
disabled:
mod_cml
mod_magnet

Features:

enabled:
auth-crypt
compress-bzip2
compress-deflate
compress-gzip
regex-conditionals
stat-cache-fam
disabled:
auth-ldap
large-files
network-ipv6
network-openssl
storage-gdbm
storage-memcache
webdav-locks
webdav-properties


确认没有问题后,开始编译,安装。

之后,恢复配置文件。下面问题来了。

尝试启动 lighttpd,出错。

2013-04-23 17:15:11: (plugin.c.169) dlopen() failed for: /opt/lighttpd/lib/mod_mysql_vhost.so libmysqlclient.so.18: cannot open shared object file: No such file or directory
2013-04-23 17:15:11: (server.c.676) loading plugins finally failed


提示找不到mysql 的动态链接库。为啥?因为没有在系统里面注册。因为这次的包括mysql 在内的所有软件都没有使用传统的 /usr/local/ 路径,所以各自.so 文件所在的目录路径,系统自然不知道。
解决方案:
编辑位于 /etc 下的ld.so.conf 文件,加入各自的lib 目录路径。
我的ld.so.conf:

[root@PowerPC src]# cat /etc/ld.so.conf
include ld.so.conf.d/*.conf
/usr/local/lib
/usr/local/libevent/lib
/opt/lighttpd/lib
/opt/mysql/lib


保存之后,ldconfig -v,刷新所有库。
注:这里说点题外话,关于动态链接库的添加,有人建议就像BIN $PATH 一样,追加到系统的 $LD_LIBRARY_PATH 变量里,我个人是不建议这么做的。

再次运行 lighttpd,果然没有问题了。

打印出lighttpd 的版本信息:

[root@PowerPC ~]# lighttpd -V
lighttpd/1.4.32 - a light and fast webserver
Build-Date: Apr 23 2013 16:12:29

Event Handlers:

+ select (generic)
+ poll (Unix)
- rt-signals (Linux 2.4+)
+ epoll (Linux 2.6)
- /dev/poll (Solaris)
- eventports (Solaris)
- kqueue (FreeBSD)
- libev (generic)

Network handler:

+ linux-sendfile
- freebsd-sendfile
- solaris-sendfilev
+ writev
+ write
- mmap support

Features:

- IPv6 support
+ zlib support
+ bzip2 support
+ crypt support
- SSL Support
+ PCRE support
+ mySQL support
- LDAP support
- memcached support
+ FAM support
- LUA support
- xml support
- SQLite support
- GDBM support


搞定了lighttpd,接下来就是 nginx 了,这是剩下的最后一个了。

解压源码,进入源码主目录,
我的configure:

[root@PowerPC nginx-1.3.16]# ./configure \
> --prefix=/opt/nginx \
> --sbin-path=/opt/nginx/sbin/nginx \
> --conf-path=/opt/nginx/etc/nginx.conf \
> --error-log-path=/opt/nginx/var/error.log \
> --pid-path=/opt/nginx/var/nginx.pid \
> --lock-path=/opt/nginx/var/nginx.lock \
> --user=http \
> --group=web \
> --with-poll_module \
> --with-file-aio \
> --with-http_spdy_module \
> --with-http_realip_module \
> --with-http_addition_module \
> --with-http_image_filter_module \
> --with-http_flv_module \
> --with-http_mp4_module \
> --with-http_gunzip_module \
> --with-http_gzip_static_module \
> --without-http_fastcgi_module \
> --without-http_uwsgi_module \
> --without-http_scgi_module \
> --http-log-path=/opt/nginx/var/access.log \
> --http-client-body-temp-path=/tmp/nginx/request \
> --http-proxy-temp-path=/tmp/nginx/proxy \
> --without-mail_pop3_module \
> --without-mail_imap_module \
> --without-mail_smtp_module


检查依赖,一次通过。同样,和lighttpd 一样,编译程序给出了编译概况,见下:

Configuration summary
+ using system PCRE library
+ OpenSSL library is not used
+ md5: using system crypto library
+ sha1: using system crypto library
+ using system zlib library

nginx path prefix: "/opt/nginx"
nginx binary file: "/opt/nginx/sbin/nginx"
nginx configuration prefix: "/opt/nginx/etc"
nginx configuration file: "/opt/nginx/etc/nginx.conf"
nginx pid file: "/opt/nginx/var/nginx.pid"
nginx error log file: "/opt/nginx/var/error.log"
nginx http access log file: "/opt/nginx/var/access.log"
nginx http client request body temporary files: "/tmp/nginx/request"
nginx http proxy temporary files: "/tmp/nginx/proxy"


确认没有问题,make && make install 开始编译和安装。
一切都很顺利。在最后别忘了恢复下配置文件。
主要就是个 nginx.conf 文件。

好了,至此,这次的VPS升级、折腾手记全文完。

谢谢观赏。:)

_全剧终_
[ ] ( 3607 次浏览 ) 永久链接 ( 3 / 2682 )
VPS 折腾全记录-part 3 

接上。

搞完了底层基础(db 和 runtime),还是搞上层软件(ftp 、http 、cache server).

先是vsftpd,解压,进入目录:
首先编辑 builddefs.h,选择一些特性(如tcp wrapper)的开与关。

接下来直接make 编译,一般来讲几乎不会有问题,如果出错,那就是bug.

编译完成,安装。

[root@PowerPC vsftpd-3.0.2]# make install
if [ -x /usr/local/sbin ]; then \
install -m 755 vsftpd /usr/local/sbin/vsftpd; \
else \
install -m 755 vsftpd /usr/sbin/vsftpd; fi
if [ -x /usr/local/man ]; then \
install -m 644 vsftpd.8 /usr/local/man/man8/vsftpd.8; \
install -m 644 vsftpd.conf.5 /usr/local/man/man5/vsftpd.conf.5; \
elif [ -x /usr/share/man ]; then \
install -m 644 vsftpd.8 /usr/share/man/man8/vsftpd.8; \
install -m 644 vsftpd.conf.5 /usr/share/man/man5/vsftpd.conf.5; \
else \
install -m 644 vsftpd.8 /usr/man/man8/vsftpd.8; \
install -m 644 vsftpd.conf.5 /usr/man/man5/vsftpd.conf.5; fi
if [ -x /etc/xinetd.d ]; then \
install -m 644 xinetd.d/vsftpd /etc/xinetd.d/vsftpd; fi


就是一些启动脚本,执行主程序文件,手册。如果不使用 make install ,也可以手动复制。

接下来就是恢复配置文件 vsftpd.conf.

按说,因为我的vsftpd 是用pam_mysql 认证去做虚拟用户管理。本来我是打算重新编译一个pam_mysql.so 的,因为平时,每次,只要我安装了新的mysql 后都会这么做,因为之前的适用于之前版本的pam_mysql.so 不能用了。

可是,这次,很惊奇的是,给 mysql 5.6.8 的pam_mysql.so 居然可以用,呵呵。这倒给我省事了。

然而,问题还是有的。当我启动了vsftpd 后,我发现我的用户登录后出现了一个500错误:

vsftpd: refusing to run with writable root inside chroot()


经查,这是新版本的vsftpd 的一个新特性,及不允许虚拟用户的主根目录具有可写权限。

庆幸的是,这是可以关闭的。我在这里这里找到了答案。
参见:http://askubuntu.com/questions/239239/ubuntu-12-04-500-oops-vsftpd-refusing-to-run-with-writable-root-inside-chroot

修改后 vsftpd.conf 就像这样:

[root@PowerPC ~]# cat /etc/vsftpd.conf | grep chroot
# You may specify an explicit list of local users to chroot() to their home
# directory. If chroot_local_user is YES, then this list becomes a list of
# users to NOT chroot().
chroot_local_user=NO
chroot_list_enable=YES
chroot_list_file=/etc/vsftpd/ftpusers
allow_writeable_chroot=YES


请注意最后一行,是它禁用了这一安全检查。

这下,vsftpd 又可以像从前一样自由登入登出了。

搞定了ftp 服务器,现在轮到代理、缓存服务器了。

一样,解压varnish源码包,进入根目录:
我的configure:

[root@PowerPC varnish-3.0.3]# ./configure \
> --prefix=/opt/varnish \
> --disable-largefile \
> --enable-epoll \
> --with-pcre-config=/usr/bin/pcre-config \
> --with-jemalloc


检查编译,通过,开始编译安装。

一切都很顺利。

最后,别忘了恢复配置文件 default.vcl.

好了,缓存服务器也搞定了。

未完待续。
[ ] ( 1849 次浏览 ) 永久链接 ( 3 / 2414 )
VPS 折腾全记录-part 2 

接上文。

搞定了mysql,接下来是php.

我选择的是最新版的php 5.5 beta,解压,进入目录:

我的configure:

[root@PowerPC php-5.5.0beta3]# ./configure \
> --prefix=/opt/php \
> --disable-cli \
> --enable-fpm \
> --with-fpm-user=http \
> --with-fpm-group=web \
> --with-config-file-scan-dir=/etc \
> --disable-ipv6 \ (remove later)
> --with-zlib \
> --with-bz2 \
> --enable-calendar \
> --with-curl \
> --enable-dba \
> --enable-exif \
> --enable-ftp \
> --with-gd \
> --with-mhash \
> --enable-intl \ (remove later)
> --enable-mbstring \
> --with-mcrypt \
> --with-mysql=/opt/mysql \
> --with-mysql-sock=/tmp/mysql.sock \
> --with-mysqli=/opt/mysql/bin/mysql_config \
> --with-pdo-mysql=/opt/mysql \
> --enable-soap \
> --enable-sockets \
> --enable-wddx \
> --with-xmlrpc \
> --enable-zip \
> --without-pear


检查依赖,报错,提示:

configure: error: ICU version 4.0 or later is required


可是我vps的 centos 4 源里面的ICU 库版本是3.x的。故而放弃启用 "--enable-intl".

之后依赖没有问题,开始编译。报错:

ext/sockets/.libs/conversions.o: In function `from_zval_write_sin6_addr':
/root/php-5.5.0beta3/ext/sockets/conversions.c:610: undefined reference to `php_set_inet6_addr'
collect2: ld returned 1 exit status
make: *** [sapi/fpm/php-fpm] Error 1


经查,这是php 5.5 的一个已知bug,在php 5.3.x 上没有复现。移除显式的禁用ipv6 的 “--disable-ipv6” 后,再次编译通过。

编译完毕,安装。


[root@PowerPC php-5.5.0beta3]# make install
Installing shared extensions: /opt/php/lib/php/extensions/no-debug-non-zts-20121212/
Installing PHP FPM binary: /opt/php/sbin/
Installing PHP FPM config: /opt/php/etc/
Installing PHP FPM man page: /opt/php/php/man/man8/
Installing PHP FPM status page: /opt/php/php/fpm/
Installing PHP CGI binary: /opt/php/bin/
cp: cannot create regular file `/opt/php/bin/#INST@11313#': No such file or directory
make: *** [install-cgi] Error 1


继续出错,从日志可以看出,创建 bin 目录出错。经查,这也是php的一个已知bug.在没有指定 bin/sbin 的具体路径时会触发。
参见:https://bugs.php.net/bug.php?id=61345

解决方案,手动创建即可。


[root@PowerPC php-5.5.0beta3]# mkdir /opt/php/bin

[root@PowerPC php-5.5.0beta3]# make install
/bin/sh /root/php-5.5.0beta3/libtool --silent --preserve-dup-deps --mode=install cp ext/opcache/opcache.la /root/php-5.5.0beta3/modules
Installing shared extensions: /opt/php/lib/php/extensions/no-debug-non-zts-20121212/
Installing PHP FPM binary: /opt/php/sbin/
Installing PHP FPM config: /opt/php/etc/
Installing PHP FPM man page: /opt/php/php/man/man8/
Installing PHP FPM status page: /opt/php/php/fpm/
Installing PHP CGI binary: /opt/php/bin/
Installing build environment: /opt/php/lib/php/build/
Installing header files: /opt/php/include/php/
Installing helper programs: /opt/php/bin/
program: phpize
program: php-config
Installing man pages: /opt/php/php/man/man1/
page: phpize.1
page: php-config.1
Installing PDO headers: /opt/php/include/php/ext/pdo/


至此,php 安装完毕。

可是还没完,还得为其安装 APC 模块。

我使用的是php apc 官方最新的版本,3.1.13。解压,进入目录:

首先运行 phpize,生成 configure 文件.

[root@PowerPC APC-3.1.13]# phpize
Configuring for:
PHP Api Version: 20121113
Zend Module Api No: 20121212
Zend Extension Api No: 220121212


下面开始编译,我的configure:

[root@PowerPC APC-3.1.13]# ./configure \
> --enable-apc \
> --enable-apc-filehits \
> --with-php-config=/opt/php/bin/php-config


依赖没问题,开始编译。出错,日志如下:

/root/APC-3.1.13/apc_compile.c: In function ‘apc_copy_trait_alias’:
/root/APC-3.1.13/apc_compile.c:2379: error: ‘zend_trait_alias’ has no member named ‘function’
/root/APC-3.1.13/apc_compile.c:2380: error: ‘zend_trait_alias’ has no member named ‘function’
/root/APC-3.1.13/apc_compile.c: In function ‘apc_copy_trait_precedence’:
/root/APC-3.1.13/apc_compile.c:2416: error: ‘zend_trait_precedence’ has no member named ‘function’
/root/APC-3.1.13/apc_compile.c:2417: error: ‘zend_trait_precedence’ has no member named ‘function’
make: *** [apc_compile.lo] Error 1

搜索无果,没有找到与此相关的任何有用信息。无奈,只好认为是此版本的固有bug。只好使用最新的开发版本试试看。

签出APC 位于 SVN 代码库的最新版本:
svn co http://svn.php.net/repository/pecl/apc/trunk apc

重复之前的步骤,编译通过。囧~看来真是这样。
开始安装插件至php:

[root@PowerPC apc]# make install
Installing shared extensions: /opt/php/lib/php/extensions/no-debug-non-zts-20121212/
Installing header files: /opt/php/include/php/


这时,记得恢复下之前备份的配置文件,php.ini 和 php-fpm.conf 。

打印下php的版本和模块信息,以做参照。

[root@PowerPC etc]# php-fpm -v
PHP 5.5.0beta3 (fpm-fcgi) (built: Apr 19 2013 18:36:12)
Copyright (c) 1997-2013 The PHP Group
Zend Engine v2.5.0-dev, Copyright (c) 1998-2013 Zend Technologies

[root@PowerPC etc]# php-fpm -m
[PHP Modules]
apc
bz2
calendar
cgi-fcgi
Core
ctype
curl
date
dba
dom
ereg
exif
fileinfo
filter
ftp
gd
hash
iconv
json
libxml
mbstring
mcrypt
mhash
mysql
mysqli
pcre
PDO
pdo_mysql
pdo_sqlite
Phar
posix
Reflection
session
SimpleXML
soap
sockets
SPL
sqlite3
standard
tokenizer
wddx
xml
xmlreader
xmlrpc
xmlwriter
zip
zlib

[Zend Modules]


到这里,关于 php 的事情算是完了。

未完待续。
[ ] ( 4749 次浏览 ) 永久链接 ( 3.1 / 2413 )
VPS 折腾全记录-part 1 

是的,在犹豫、彷徨、挣扎了那么那么久之后,我终于狠下心来,抽出了几天的时间,把早就该升级的VPS从里到外翻新了一遍。

前言:由于整体篇幅较大,所以采用了分段发表,此文为第一部分。
又及:前几天刚刚发生了四川芦山特大地震,在此向死难者致哀。

下面正文开始,首先下载升级所需的所有软件的最新版本:

20 wget http://pecl.php.net/get/APC-3.1.13.tgz
22 wget http://download.lighttpd.net/lighttpd/r ... 32.tar.bz2
24 wget http://cdn.mysql.com/Downloads/MySQL-5. ... .10.tar.gz
26 wget http://nginx.org/download/nginx-1.3.15.tar.gz
28 wget http://downloads.php.net/dsp/php-5.5.0beta3.tar.bz2
30 wget http://repo.varnish-cache.org/source/va ... 0.3.tar.gz
32 wget https://security.appspot.com/downloads/vsftpd-3.0.2.tar.gz


后来有一些软件,如nginx,在我下载后的几个小时里,又发布了新版,后来使用了新版。

移除旧软件包:

[root@PowerPC pub]# rm APC*
rm: remove regular file `APC-3.1.10.tgz'? y
rm: remove regular file `APC-3.1.13.tgz'? n
[root@PowerPC pub]# rm lighttpd*
rm: remove regular file `lighttpd-1.4.31.tar.bz2'? y
rm: remove regular file `lighttpd-1.4.32.tar.bz2'? n
[root@PowerPC pub]# rm mysql*
rm: remove regular file `mysql-5.6.10.tar.gz'? n
rm: remove regular file `mysql-5.6.5-m8.tar.gz'? y
[root@PowerPC pub]# rm nginx*
rm: remove regular file `nginx-1.3.15.tar.gz'? n
rm: remove regular file `nginx-1.3.1.tar.gz'? y
[root@PowerPC pub]# rm php*
rm: remove regular file `php-5.4.0.tar.bz2'? y
rm: remove regular file `php-5.5.0beta3.tar.bz2'? n
rm: remove regular file `phpMyAdmin-3.5.1-all-languages.tar.bz2'? n
[root@PowerPC pub]# rm varnish*
rm: remove regular file `varnish-3.0.3-rc1.tar.gz'? y
rm: remove regular file `varnish-3.0.3.tar.gz'? n
[root@PowerPC pub]# rm vsftpd*
rm: remove regular file `vsftpd-2.3.4.tar.gz'? y
rm: remove regular file `vsftpd-3.0.2.tar.gz'? n


紧接着,移除老版本软件的遗留文件,备份配置文件。

备份数据库:

mysql> show databases;
+--------------------+
| Database |
+--------------------+
| bbpress |
| lighttpd |
| phpbb |
| typecho |
| url-shortize |
| vsftpd |
+--------------------+
9 rows in set (0.00 sec)


我是用 mysqldump 导出来的几个数据库。

一些前期工作搞定后,开始折腾,先是数据库:

使用的是mysql 的最新版,5.6.11,解压源码包,进入根目录:

首先查看下编译帮助:

[root@PowerPC mysql-5.6.11]# cmake -LAH
-- Running cmake version 2.6.4
-- MySQL 5.6.11
-- Packaging as: mysql-5.6.11-Linux-i686
-- HAVE_VISIBILITY_HIDDEN
-- Using cmake version 2.6.4
-- Not building NDB
-- Library mysqlclient depends on OSLIBS -lpthread;m;rt;dl
-- Library mysqlserver depends on OSLIBS -lpthread;m;rt;crypt;dl;aio
-- Configuring done
-- Generating done
-- Build files have been written to: /root/mysql-5.6.11
……
……


下面是我的cmake 参数:

[root@PowerPC mysql-5.6.11]# cmake . \
> -DCMAKE_BUILD_TYPE:STRING=Release \
> -DCMAKE_INSTALL_PREFIX:PATH=/opt/mysql \
> -DENABLE_DEBUG_SYNC:BOOL=OFF \
> -DMANUFACTURER:STRING="Built from Source By Sharl" \
> -DMYSQL_DATADIR:PATH=/var/mysql \
> -DSYSCONFDIR:PATH=/etc


依赖没有问题,开始编译。make && make install.

安装至指定目录后,由于这次使用的目录不在/usr/local 下,所以mysql 的bin 目录并不在系统 $PATH 下,得手动加入。

建议放入 ~/.bashrc 下,编辑完记得 source 以生效.

这是我的 .bashrc:

[root@PowerPC ~]# cat ~/.bashrc | grep PATH
export PATH=/opt/mysql/bin:$PATH
export PATH=/opt/php/bin:$PATH
export PATH=/opt/php/sbin:$PATH
export PATH=/opt/lighttpd/sbin:$PATH
export PATH=/opt/nginx/sbin:$PATH
export PATH=/opt/varnish/bin:$PATH
export PATH=/opt/varnish/sbin:$PATH


进入mysql主目录,安装初始数据库:

[root@PowerPC mysql]# ./scripts/mysql_install_db \
> --basedir=/opt/mysql \
> --datadir=/var/mysql \
> --user=mysql


之后,恢复配置文件,启动mysql服务。

[root@PowerPC mysql]# mysqld_safe --user=mysql &
[1] 30283


设置root密码以及匿名安全选项:

[root@PowerPC mysql]# mysql_secure_installation


NOTE: RUNNING ALL PARTS OF THIS SCRIPT IS RECOMMENDED FOR ALL MySQL
SERVERS IN PRODUCTION USE! PLEASE READ EACH STEP CAREFULLY!

In order to log into MySQL to secure it, we'll need the current
password for the root user. If you've just installed MySQL, and
you haven't set the root password yet, the password will be blank,
so you should just press enter here.

Enter current password for root (enter for none):
OK, successfully used password, moving on...

Setting the root password ensures that nobody can log into the MySQL
root user without the proper authorisation.

Set root password? [Y/n] y
New password:
Re-enter new password:
Password updated successfully!
Reloading privilege tables..
... Success!


By default, a MySQL installation has an anonymous user, allowing anyone
to log into MySQL without having to have a user account created for
them. This is intended only for testing, and to make the installation
go a bit smoother. You should remove them before moving into a
production environment.

Remove anonymous users? [Y/n] y
... Success!

Normally, root should only be allowed to connect from 'localhost'. This
ensures that someone cannot guess at the root password from the network.

Disallow root login remotely? [Y/n] y
... Success!

By default, MySQL comes with a database named 'test' that anyone can
access. This is also intended only for testing, and should be removed
before moving into a production environment.

Remove test database and access to it? [Y/n] y
- Dropping test database...
... Success!
- Removing privileges on test database...
... Success!

Reloading the privilege tables will ensure that all changes made so far
will take effect immediately.

Reload privilege tables now? [Y/n] y
... Success!


All done! If you've completed all of the above steps, your MySQL
installation should now be secure.

Thanks for using MySQL!


Cleaning up...


一切OK后,导入之前备份的数据库:

[root@PowerPC ~]# mysql -u root -p <db.sql
Enter password:
[root@PowerPC ~]# mysql -u root -p
Enter password:
Welcome to the MySQL monitor. Commands end with ; or \g.
Your MySQL connection id is 14
Server version: 5.6.11 Source distribution

Copyright (c) 2000, 2013, Oracle and/or its affiliates. All rights reserved.

Oracle is a registered trademark of Oracle Corporation and/or its
affiliates. Other names may be trademarks of their respective
owners.

Type 'help;' or '\h' for help. Type '\c' to clear the current input statement.

mysql> show databases;
+--------------------+
| Database |
+--------------------+
| information_schema |
| bbpress |
| lighttpd |
| mysql |
| performance_schema |
| phpbb |
| typecho |
| url-shortize |
| vsftpd |
+--------------------+
9 rows in set (0.00 sec)


OK,数据库导入成功。不过还要做一点小优化,就是禁用掉innoDB引擎,因为这个太占内存了。

编辑my.cnf,加入 skip-innodb 节点即可。

现在查看下数据库引擎:

mysql> show engines;
+--------------------+---------+----------------------------------------------------------------+--------------+------+------------+
| Engine | Support | Comment | Transactions | XA | Savepoints |
+--------------------+---------+----------------------------------------------------------------+--------------+------+------------+
| FEDERATED | NO | Federated MySQL storage engine | NULL | NULL | NULL |
| MRG_MYISAM | YES | Collection of identical MyISAM tables | NO | NO | NO |
| MEMORY | YES | Hash based, stored in memory, useful for temporary tables | NO | NO | NO |
| BLACKHOLE | YES | /dev/null storage engine (anything you write to it disappears) | NO | NO | NO |
| MyISAM | DEFAULT | MyISAM storage engine | NO | NO | NO |
| CSV | YES | CSV storage engine | NO | NO | NO |
| ARCHIVE | YES | Archive storage engine | NO | NO | NO |
| InnoDB | NO | Supports transactions, row-level locking, and foreign keys | NULL | NULL | NULL |
| PERFORMANCE_SCHEMA | YES | Performance Schema | NO | NO | NO |
+--------------------+---------+----------------------------------------------------------------+--------------+------+------------+
9 rows in set (0.00 sec)

mysql> quit
Bye


OK,已经禁用了。

至此,mysql 升级完成。

未完待续.
[ ] ( 3670 次浏览 ) 永久链接 ( 3.1 / 2498 )

<< <上一页 | 6 | 7 | 8 | 9 | 10 | 11 | 12 | 13 | 14 | 15 | 下一页> >>