thttpd http server 内存使用量太大的疑问 

前段时间搞了个腾讯云的7天体验服务器,难得国内的机房没备案的域名也能解析。就折腾了一下。

搞了一个号称最迷你的httpd server - thttpd.

官网:https://acme.com/software/thttpd/

下载最新的版本源码:
https://acme.com/software/thttpd/thttpd-2.28.tar.gz

解压,编译,安装。

复制 源码包内的配置文件,稍加修改,运行。

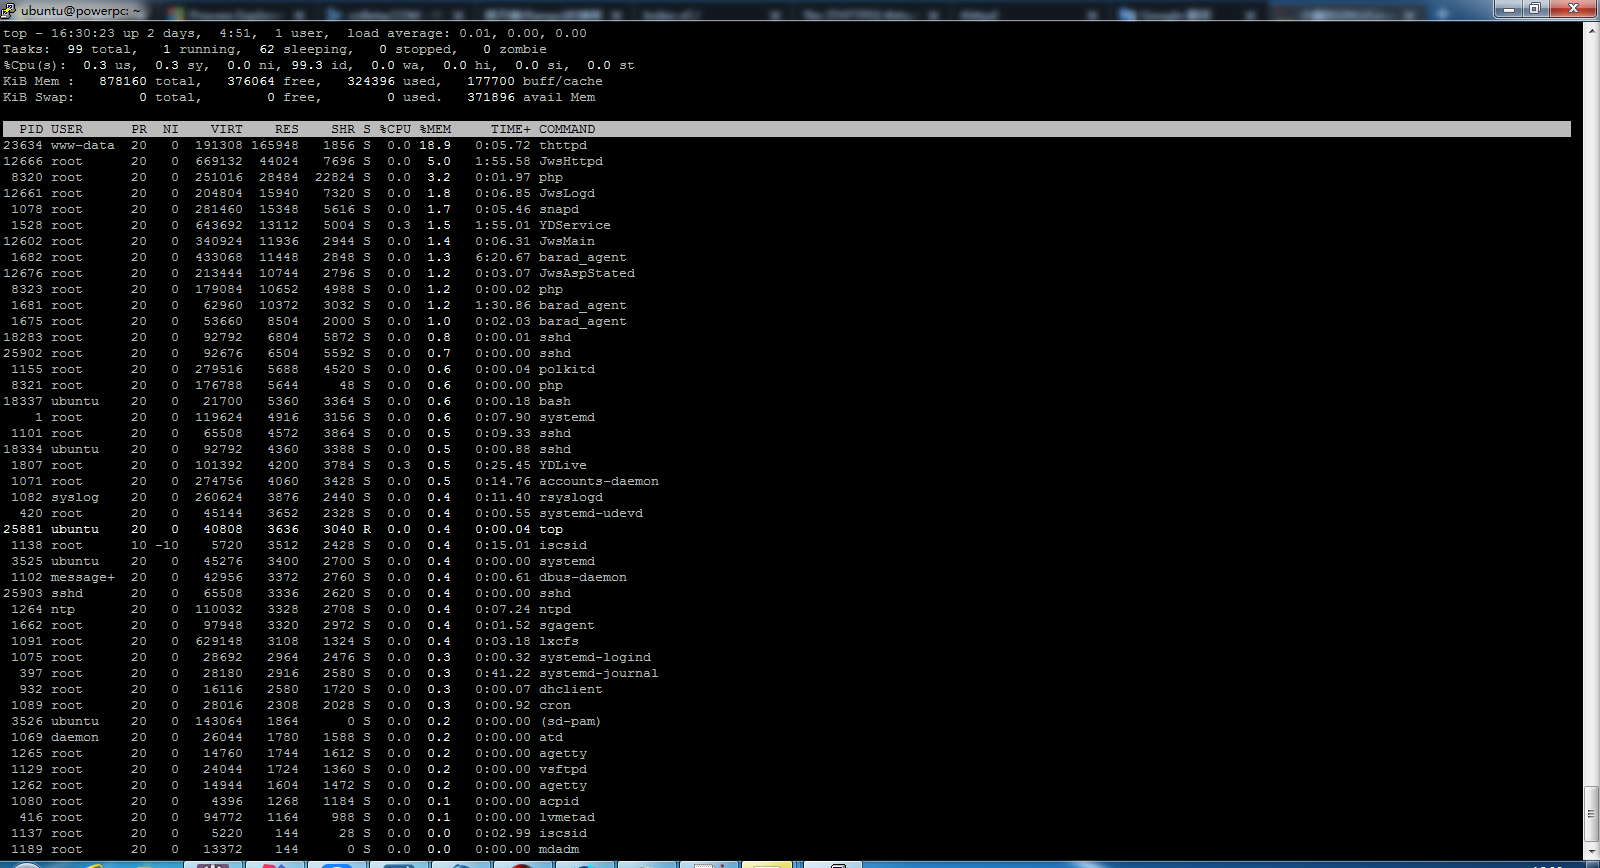
一看进程表,吓我一跳,咋thttpd 一个进程就占掉了我VPS 19%的内存!!!


ubuntu@powerpc:~$ free -m
total used free shared buff/cache available
Mem: 857 315 368 24 173 364
Swap: 0 0 0
ubuntu@powerpc:~$ ps aux | grep http
root 8320 0.0 3.2 251016 28484 ? Sl Mar07 0:01 php http.php
root 8321 0.0 0.6 176788 5644 ? S Mar07 0:00 php http.php
root 8323 0.0 1.2 179084 10652 ? S Mar07 0:00 php http.php
root 12666 0.0 5.0 669132 44024 ? Ssl Mar06 1:55 jexus: httpd worker jwsHttpd.exe
www-data 23634 0.2 18.8 191308 165948 ? Ss 15:51 0:06 /opt/thttpd/sbin/thttpd -C /opt/thttpd/config/thttpd.conf
ubuntu 26157 0.0 0.1 13232 1088 pts/0 S+ 16:34 0:00 grep --color=auto http
ubuntu@powerpc:~$


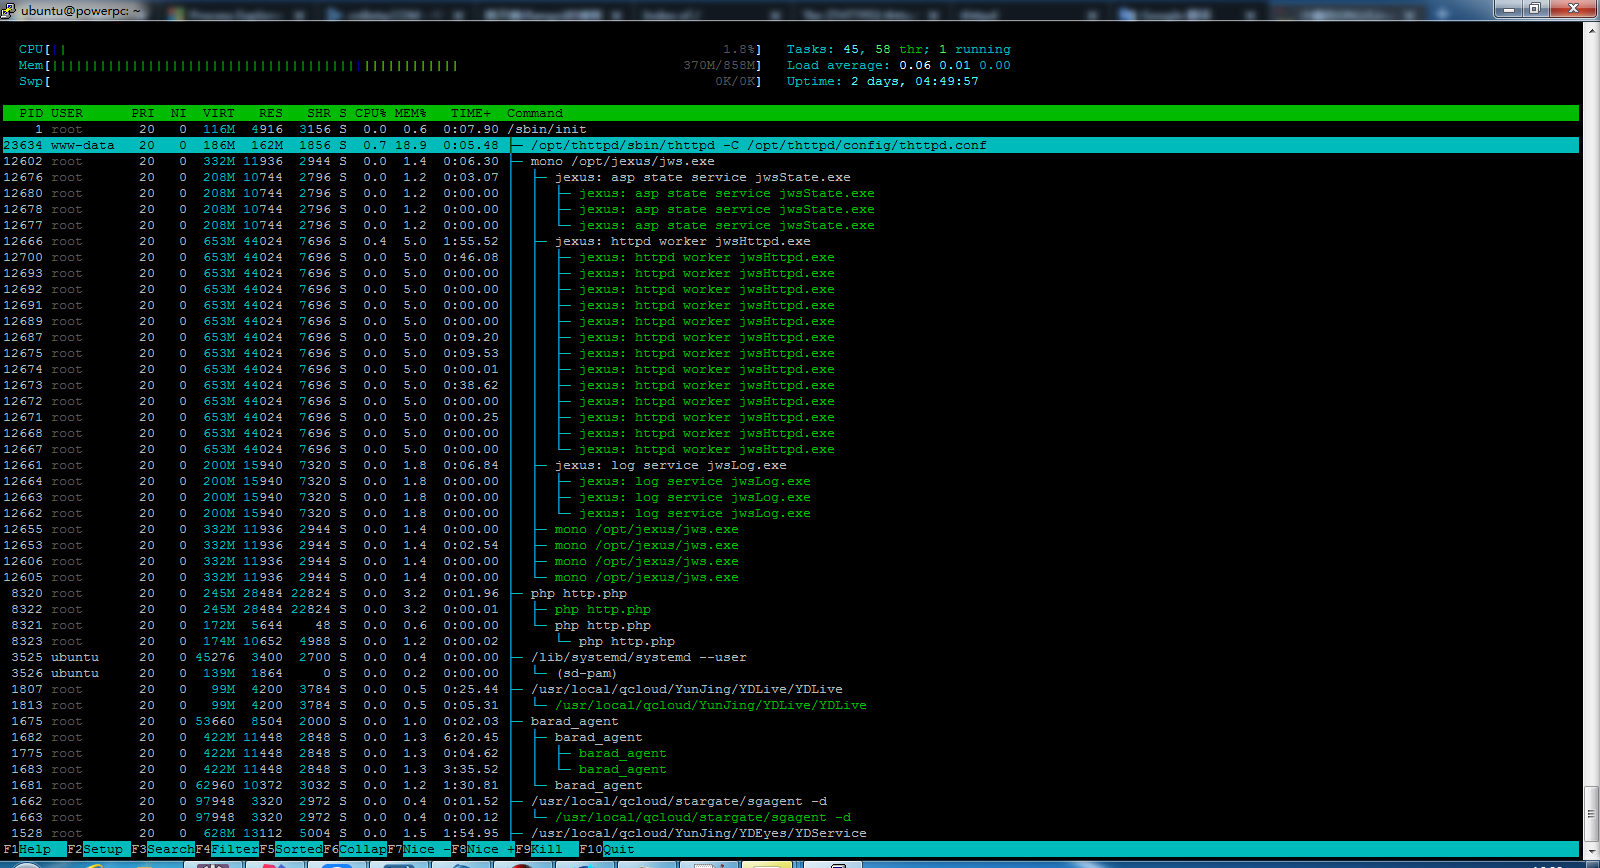
我tmd 当场就惊呆了,这内存占用快赶上MySQL了。

于是,在它的网站上找找,看有没有关于内存使用的相关配置字段,很遗憾没找到。而且由于它的功能定位很简单,导致了配置文件的选项也很少。目测不超过15个。
这是我的配置:

ubuntu@powerpc:~$ cat /opt/thttpd/config/thttpd.conf
# This section overrides defaults
port=80
dir=/var/www/html
nochroot
#data_dir
nosymlinkcheck
novhost
noglobalpasswd
user=www-data
host=0.0.0.0
logfile=/var/log/thttpd.log
pidfile=/var/run/thttpd.pid
charset=gbk
max_age=60


应该没啥毛病啊~

在它的首页我看到这样一句话:

Small:
See the comparison chart. It also has a very small run-time size, since it does not fork and is very careful about memory allocation.


意思就是:“我很小,我不会无聊的复制我自己,而且在内存分配方面我很谨慎”

这……我该如何理解这句话。

1.它不像nginx、php-fpm 那样会派生出很多worker,按说内存使用总量应该不会太大。
2.如果它没有派生功能,一直都是单进程。那么好像初始运行内存开辟大点,好像也没问题。

实在是看不懂。

后来我没辙,只能看看网友有没有和我一样有这样的疑惑,结果找到了一封18年前的邮件列表记录:

https://marc.info/?l=thttpd&m=102182637422558&w=2

面对用户关于“thttpd memory usage?”的疑问,acme的成员解释道:你用的内存查看工具是有问题的,是不准确的!

如下:

On some OSs, top seems to count memory-mapped files as part of the
program size. That makes thttpd look much bigger than it really is.


666~在下服了。
[ ] ( 3578 次浏览 ) 永久链接 ( 3 / 1812 )
呵呵,呵呵,呵呵呵 

接上一文。

刚刚抱着试试看的心态,以“digitalocean https 不通”为关键词百度了一下,发现了一个帖子。

https://www.v2ex.com/t/412798

看完我就大概明白了。还TMD一直以为自己配置哪里出了问题,卧槽,呵呵。

注:还搜到了一篇讲lighttpd 部署SSL证书的教程,来自某SSL证书销售商官网。666 不过写的蛮好的,可以用来参考。

https://doc.ssl.do/page/install-lighttpd/

因为和nginx 比起来,lighttpd 实在太小众了,中文文档确实少的可怜。
[ ] ( 1792 次浏览 ) 永久链接 ( 3.1 / 1730 )
lighttpd https SSL 配置参数优化 

前端时间从 freessl.org 搞了一个免费的SSL证书,给自己的一个站点用上了。

https://sb.caonima.pw

不过部署好了后我这边一直访问不了。一直以为是SSL的配置没配好。

今天参照着 myssl.com 提供的优化建议把配置弄了一下,如下:

$SERVER["socket"] == ":443" {
ssl.engine = "enable"
ssl.use-sslv2 = "disable"
ssl.use-sslv3 = "disable"
#ssl.openssl.ssl-conf-cmd = ("Protocol" => "-ALL, TLSv1.2")
ssl.cipher-list = "ECDHE-RSA-AES128-GCM-SHA256:ECDHE:ECDH:AES:HIGH:!NULL:!aNULL:!MD5:!ADH:!RC4:!DH:!DHE"
ssl.honor-cipher-order = "enable"
ssl.pemfile = "/home/ftp/.ssl/ssl.pem"
ssl.ca-file = "/home/ftp/.ssl/ca.pem"
server.name = "sb.caonima.pw"
server.document-root = "/home/ftp"
}
ssl.disable-client-renegotiation = "enable"


重启lighttpd,看了一下,评级从之前的B升到了A。

https://myssl.com/sb.caonima.pw

但是,貌似我本地还是不能访问。

VPS里面倒是可以,

[root@sharl-centos ~]# curl -vI https://sb.caonima.pw
* About to connect() to sb.caonima.pw port 443 (#0)
* Trying 104.236.147.24... connected
* Connected to sb.caonima.pw (104.236.147.24) port 443 (#0)
* Initializing NSS with certpath: sql:/etc/pki/nssdb
* CAfile: /etc/pki/tls/certs/ca-bundle.crt
CApath: none
* SSL connection using TLS_ECDHE_RSA_WITH_AES_128_GCM_SHA256
* Server certificate:
* subject: CN=sb.caonima.pw
* start date: Feb 24 00:00:00 2018 GMT
* expire date: Feb 24 12:00:00 2019 GMT
* common name: sb.caonima.pw
* issuer: CN=TrustAsia TLS RSA CA,OU=Domain Validated SSL,O="TrustAsia Technologies, Inc.",C=CN
> HEAD / HTTP/1.1
> User-Agent: curl/7.19.7 (x86_64-redhat-linux-gnu) libcurl/7.19.7 NSS/3.27.1 zlib/1.2.3 libidn/1.18 libssh2/1.4.2
> Host: sb.caonima.pw
> Accept: */*
>
< HTTP/1.1 200 OK
HTTP/1.1 200 OK
< Content-Type: text/html; charset=UTF-8
Content-Type: text/html; charset=UTF-8
< Content-Length: 6705
Content-Length: 6705
< Date: Fri, 02 Mar 2018 09:10:51 GMT
Date: Fri, 02 Mar 2018 09:10:51 GMT
< Server: lighttpd
Server: lighttpd

<
* Connection #0 to host sb.caonima.pw left intact
* Closing connection #0


此外我还试了ssllibs,
https://www.ssllabs.com/ssltest/analyze.html?d=sb.caonima.pw

好像也没啥问题。敢情除了我自己,其他人都能访问我的站点,我日!!!!

这个问题还要继续研究。

注:本文撰写实践参考了以下链接:
https://redmine.lighttpd.net/projects/lighttpd/wiki/Docs_SSL
https://www.openssl.org/docs/manmaster/man1/ciphers.html
[ ] ( 4037 次浏览 ) 永久链接 ( 3 / 1712 )
nginx 设置反向代理 揭示板套图网站 

揭示板这个套图网站我一直很喜欢,不过一直被墙,域名也一直再换。

虽然订阅了它的域名发布页:http://www.anonymous-fan.com

不过还是觉得麻烦。

特别是手机浏览器(移动4G网络)打开网页看不到图片,也很烦。

所以最近就觉得用DO闲置的VPS搞个代理。主意不错!!!

经过一番研究,主要需要代理三个方面。

我挑选了 地址二:http://www.1press.info 这个域名。

1.网站首页
nginx 配置如下:

location / {
proxy_set_header Host 'www.1press.info';
proxy_set_header Referer 'www.1press.info';
proxy_pass http://www.1press.info;
sub_filter 'www.1press.info' 'dsb.caonima.pw:81';
sub_filter '27.255.79.40' 'dsb.caonima.pw:81/img1';
sub_filter '174.139.202.79' 'dsb.caonima.pw:81/img2';
sub_filter_once off;
}


2.套图CDN
nginx 配置如下:

location ~/img2(.*)$ {
proxy_pass_request_headers on;
proxy_pass_request_body off;
proxy_set_header X-Real-IP $remote_addr;
proxy_set_header X-Forwarded-For $remote_addr;
proxy_set_header Host 'www.1press.info';
proxy_set_header Referer 'www.1press.info';
proxy_pass http://174.139.202.79$1;
}

3.其他图片资源
nginx 配置如下:

location ~/img1(.*)$ {
proxy_pass_request_headers on;
proxy_pass_request_body off;
proxy_set_header X-Real-IP $remote_addr;
proxy_set_header X-Forwarded-For $remote_addr;
proxy_set_header Host 'www.1press.info';
proxy_set_header Referer 'www.1press.info';
proxy_pass http://27.255.79.40$1;
}


保存配置,刷新nginx 配置。

访问 http://dsb.caonima.pw:81,一切OK。美滋滋~
[ ] ( 2414 次浏览 ) 永久链接 ( 3.1 / 1717 )
lumen 部署在nginx 子目录下配置 IDC增强版 

今天吃完饭回来就在想上午的那个方案虽然可行,但是有个弊端。

就是每上一个新版本,除了上传新版本文件夹之外 还得编辑下 nginx vhost 配置,新增一个虚拟主机。

说麻烦虽然不麻烦 不过也挺烦人的。没有做到自适应,需要人工干预。

所以又折腾了一下。

配置如下:

server {
listen 80;
server_name haha.17ping.cn;
root /data/www/sdkHoster;

location / {
index index.php index.htm index.html;
autoindex on;
}

location ~ /([\w\d_]+)/([\w/]*)$ {
index index.php index.htm index.html;
try_files $uri $uri/ /$1/public/index.php?$query_string;
#return 500 $1;
}

# location /sdk1_0 {
# root /data/www/sdkHoster;
# index index.php index.htm index.html;
# try_files $uri $uri/ /sdk1_0/public/index.php?$query_string;
# }

# location /sdk1_1 {
# root /data/www/sdkHoster;
# index index.php index.htm index.html;
# try_files $uri $uri/ /sdk1_1/public/index.php?$query_string;
# }

location ~ \.php$ {
set $newurl $request_uri;
if ($newurl ~ ^/sdk([\d_]+)(.*)$) {
set $newurl $2;
}
fastcgi_split_path_info ^(.+\.php)(/.+)$;
fastcgi_pass unix:/run/php/php7.0-fpm.sock;
#fastcgi_pass 127.0.0.1:9000;
fastcgi_index index.php;
fastcgi_param SCRIPT_FILENAME $document_root/$fastcgi_script_name;
include fastcgi_params;
fastcgi_param REQUEST_URI $newurl;
}

location ~ \.(css|js|swf|php|htm|html)$ {
add_header Cache-Control no-store;
}

location ~ /\.ht {
deny all;
}
}


保存,重载配置。

手动复制了一份 sdk1_2 目录,重命名为sdk1_2.
访问 http://haha.17ping.cn/sdk1_2/ 成功,美滋滋。

注:本文撰写实践时参考了一下文章:
https://serverfault.com/questions/826663/nginx-location-regex-variable-not-working-with-try-file
https://stackoverflow.com/questions/33890599/nginx-match-location-with-regex
https://superuser.com/questions/330194/how-to-i-get-variables-from-location-in-nginx
http://nginx.org/en/docs/http/ngx_http_ ... l#location
http://nginx.org/en/docs/http/ngx_http_ ... log_format
http://nginx.org/en/docs/http/ngx_http_ ... tml#return
https://regex101.com/
[ ] ( 10612 次浏览 ) 永久链接 ( 2.9 / 1790 )

<< <上一页 | 3 | 4 | 5 | 6 | 7 | 8 | 9 | 10 | 11 | 12 | 下一页> >>