VPS瘦身,升级Lighttpd 

考虑到VPS越来越卡,故而进行瘦身。

遂移除Varnish Cache 以及 Nginx,删除所有相关文件,只存档了配置文件以备用。

修改lighttpd 端口从81至80,大功告成。

顺手升级lighttpd,下载源码包,解压,进入目录:

曾打算集成uwsgi协议,未果。

我的configure:
[root@PowerPC lighttpd-1.4.35]# ./configure \
> --prefix=/opt/lighttpd \
> --enable-lfs=no \
> --disable-ipv6 \
> --with-mysql=/opt/mysql/bin/mysql_config \
> --with-attr \
> --with-pcre \
> --with-zlib

依赖没有问题,遂make 编译。

概况:

Plugins:

enabled:
mod_access
mod_accesslog
mod_alias
mod_auth
mod_cgi
mod_compress
mod_dirlisting
mod_evhost
mod_expire
mod_extforward
mod_fastcgi
mod_flv_streaming
mod_indexfile
mod_mysql_vhost
mod_proxy
mod_redirect
mod_rewrite
mod_rrdtool
mod_scgi
mod_secdownload
mod_setenv
mod_simple_vhost
mod_ssi
mod_staticfile
mod_status
mod_trigger_b4_dl
mod_userdir
mod_usertrack
mod_webdav
disabled:
mod_cml
mod_magnet

Features:

enabled:
auth-crypt
compress-bzip2
compress-deflate
compress-gzip
regex-conditionals
disabled:
auth-ldap
large-files
network-ipv6
network-openssl
stat-cache-fam
storage-gdbm
storage-memcache
webdav-locks
webdav-properties


一切看起来OK,安装。

启动服务,一切运行正常。至此完成。
[ ] ( 2991 次浏览 ) 永久链接 ( 3 / 2467 )
在LMDE 201403上安装Broadcom STA 4311 无线网卡驱动 

最近,我最爱的LMDE 发布了2014年的最新版本,UP8.作为它的狂热爱好者的我,自然要果断安装使用。

下载、烧盘,格掉了我之前笔记本用的Linux Mint Olivia 版本,换上了LMDE.

我很喜欢LMDE,是因为它的滚动更新特性。也就是说我以后再也不用反复的重装、折腾我的笔记本了。

可是刚装完,问题来了。我之前在Ubuntu、Linux Mint 上都可以正常工作的博通的无线网卡挂了。

以前用Ubuntu的时候,有个受限驱动列表,里面会自动的检索出当前系统可用的闭源驱动包,只需点击安装激活,重启即可。

而在Linux Mint 上的时候,虽没有Ubuntu那么方便,但是也有b44 b43 b43legacy ssb brcmsmac 这些内核级别的驱动模块可以用。只需两行命令即可。


sudo apt-get install b43-fwcutter firmware-b43-installer


这样就可以编译出适用于当前系统的博通无线芯片驱动了。

然而这些成功的经验,在我现在的LMDE上都均告失败。

这些驱动模块不是有冲突,就是没有及时更新,不能用。再有就是根本无法顺利编译通过。

我为此问题整整折磨了两天,还在linux mint 的community里面提了问,不过依然没有太好的效果。

就在今天早些时候,linux mint forum 里面的一篇帖子引起了我的注意,后来在其指引的一篇debian的wiki文档里,找到了解决的办法。

即用软件源里面博通官方的闭源驱动来替代不起作用的开源内核驱动。

操作步骤如下:
1.移除所有之前安装的开源内核驱动软件包及配置文件。

apt-get purge b43-fwcutter firmware-b43-installer broadcom-sta-common broadcom-sta-source


2.安装debian官方推荐的闭源驱动包和当前内核头文。

apt-get install linux-headers-$(uname -r|sed 's,[^-]*-[^-]*-,,') broadcom-sta-dkms


这段命令后,系统便会自动编译出博通官方芯片的驱动模块,并载入内核。

由于linux 内核里面自带了b43的驱动模块,所以该软件会自动把b43,b44等模块加入黑名单,以防系统启动时候载入。文件内容如下:

sharl-laptop ~ # cat /etc/modprobe.d/broadcom-sta-dkms.conf
# wl module from Broadcom conflicts with the following modules:
blacklist b43
blacklist b43legacy
blacklist b44
blacklist bcma
blacklist brcm80211
blacklist brcmsmac
blacklist ssb
sharl-laptop ~ #


一切确认OK后,重启。果然久违的WIFI指示灯又亮了,哦耶!

注:本文撰写时参考了以下文档:
http://forums.linuxmint.com/viewtopic.p ... p;t=158702
http://forums.linuxmint.com/viewtopic.p ... p;t=154849
https://wiki.debian.org/wl
http://community.linuxmint.com/tutorial/view/218
http://community.linuxmint.com/tutorial/view/379
http://askubuntu.com/questions/55868/in ... ss-drivers
[ ] ( 4061 次浏览 ) 永久链接 ( 2.9 / 2599 )
在Ubuntu 上启用普联 tp-link TL-WDN3321 300M双频无线USB网卡 

话说这款网卡买了好久,由于采用的是台湾 ralink tek 的芯片,而该废品厂家一直没有发布一款linux下可用的驱动。

从而导致了包括tp-link在内采用其RT5572芯片的无线网卡均不可用于GNU/Linux。

这让我们这些GNU/Linux 爱好者苦恼至极。

期间也曾经去ralink(http://www.mediatek.com/_en/07_downloads/01_windows.php?sn=501)下载过其提供的所谓 "for linux" 的驱动,结果不是假死就是没反应。

后来我一度放弃了,就转用了一段Windows 8.

直到昨天我订阅的在launchpad.net 的关于 Ralink rt5572 芯片无驱动的bug(https://bugs.launchpad.net/ubuntu/+source/linux/+bug/1020650) 收到了一位开发者的回复。

他指出,最新的Ubuntu 13.10 内核已经确认包含ralink rt5572 的驱动,不过由于距离13.10 发布尚有时日,他便提供了ubuntu kernel team 放出适用于13.10 的3.10内核包。

地址:http://kernel.ubuntu.com/~kernel-ppa/mainline/v3.10-saucy/

听到这个消息,我顿时来了精神。

火速下载,安装。

由于我是x64的系统,故而下载了:
http://kernel.ubuntu.com/~kernel-ppa/ma ... _amd64.deb
http://kernel.ubuntu.com/~kernel-ppa/ma ... 35_all.deb
http://kernel.ubuntu.com/~kernel-ppa/ma ... _amd64.deb

三个deb包。

进去ubuntu,安装:

sharl@sharl-desktop:~/下载$ ll
总用量 58012
drwxr-xr-x 3 sharl sharl 4096 7月 14 12:09 ./
drwxr-xr-x 28 sharl sharl 4096 7月 14 12:09 ../
drwx------ 5 sharl sharl 4096 5月 2 15:36 bt/
-rw------- 1 sharl sharl 12526754 7月 14 11:15 linux-headers-3.10.0-031000_3.10.0-031000.201306301935_all.deb
-rw------- 1 sharl sharl 994270 7月 14 11:12 linux-headers-3.10.0-031000-generic_3.10.0-031000.201306301935_amd64.deb
-rw------- 1 sharl sharl 45866544 6月 30 23:42 linux-image-3.10.0-031000-generic_3.10.0-031000.201306301935_amd64.deb
sharl@sharl-desktop:~/下载$ sudo dpkg -i linux-headers-3.10.0-031000_3.10.0-031000.201306301935_all.deb
Selecting previously unselected package linux-headers-3.10.0-031000.
(正在读取数据库 ... 系统当前共安装有 182756 个文件和目录。)
正在解压缩 linux-headers-3.10.0-031000 (从 linux-headers-3.10.0-031000_3.10.0-031000.201306301935_all.deb) ...
正在设置 linux-headers-3.10.0-031000 (3.10.0-031000.201306301935) ...
sharl@sharl-desktop:~/下载$ sudo dpkg -i linux-headers-3.10.0-031000-generic_3.10.0-031000.201306301935_amd64.deb
(正在读取数据库 ... 系统当前共安装有 197770 个文件和目录。)
正预备替换 linux-headers-3.10.0-031000-generic 3.10.0-031000.201306301935 (使用 linux-headers-3.10.0-031000-generic_3.10.0-031000.201306301935_amd64.deb) ...
正在解压缩将用于更替的包文件 linux-headers-3.10.0-031000-generic ...
正在设置 linux-headers-3.10.0-031000-generic (3.10.0-031000.201306301935) ...
Examining /etc/kernel/header_postinst.d.
run-parts: executing /etc/kernel/header_postinst.d/dkms 3.10.0-031000-generic /boot/vmlinuz-3.10.0-031000-generic
sharl@sharl-desktop:~/下载$ sudo dpkg -i linux-image-3.10.0-031000-generic_3.10.0-031000.201306301935_amd64.deb
Selecting previously unselected package linux-image-3.10.0-031000-generic.
(正在读取数据库 ... 系统当前共安装有 197770 个文件和目录。)
正在解压缩 linux-image-3.10.0-031000-generic (从 linux-image-3.10.0-031000-generic_3.10.0-031000.201306301935_amd64.deb) ...
Done.
正在设置 linux-image-3.10.0-031000-generic (3.10.0-031000.201306301935) ...
Running depmod.
update-initramfs: deferring update (hook will be called later)
Examining /etc/kernel/postinst.d.
run-parts: executing /etc/kernel/postinst.d/apt-auto-removal 3.10.0-031000-generic /boot/vmlinuz-3.10.0-031000-generic
run-parts: executing /etc/kernel/postinst.d/dkms 3.10.0-031000-generic /boot/vmlinuz-3.10.0-031000-generic
run-parts: executing /etc/kernel/postinst.d/initramfs-tools 3.10.0-031000-generic /boot/vmlinuz-3.10.0-031000-generic
update-initramfs: Generating /boot/initrd.img-3.10.0-031000-generic
run-parts: executing /etc/kernel/postinst.d/pm-utils 3.10.0-031000-generic /boot/vmlinuz-3.10.0-031000-generic
run-parts: executing /etc/kernel/postinst.d/update-notifier 3.10.0-031000-generic /boot/vmlinuz-3.10.0-031000-generic
run-parts: executing /etc/kernel/postinst.d/zz-update-grub 3.10.0-031000-generic /boot/vmlinuz-3.10.0-031000-generic
Generating grub.cfg ...
Found linux image: /boot/vmlinuz-3.10.0-031000-generic
Found initrd image: /boot/initrd.img-3.10.0-031000-generic
Found linux image: /boot/vmlinuz-3.8.0-19-generic
Found initrd image: /boot/initrd.img-3.8.0-19-generic
Found memtest86+ image: /boot/memtest86+.bin
Found Windows 8 (loader) on /dev/sda2
done


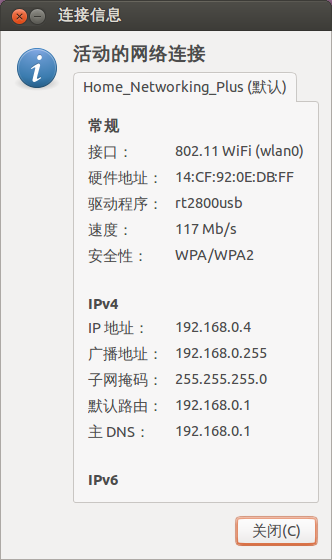
安装重启,果然tp-link tl-wdn3321 无线网卡复活了。如图:


附新内核与旧内核的数据比较:
旧内核:

sharl@sharl-desktop:~$ uname -a
Linux sharl-desktop 3.8.0-19-generic #30-Ubuntu SMP Wed May 1 16:35:23 UTC 2013 x86_64 x86_64 x86_64 GNU/Linux
sharl@sharl-desktop:~$ lsusb
Bus 001 Device 002: ID 8087:0024 Intel Corp. Integrated Rate Matching Hub
Bus 002 Device 002: ID 8087:0024 Intel Corp. Integrated Rate Matching Hub
Bus 001 Device 001: ID 1d6b:0002 Linux Foundation 2.0 root hub
Bus 002 Device 001: ID 1d6b:0002 Linux Foundation 2.0 root hub
Bus 002 Device 003: ID 05e3:0608 Genesys Logic, Inc. USB-2.0 4-Port HUB
Bus 002 Device 004: ID 0ac8:303b Z-Star Microelectronics Corp. ZC0303 Webcam
Bus 002 Device 005: ID 0bc2:3300 Seagate RSS LLC
Bus 002 Device 006: ID 046d:c52e Logitech, Inc.
Bus 002 Device 007: ID 062a:8668 Creative Labs
Bus 002 Device 008: ID 1a1d:8301 Veho
Bus 002 Device 009: ID 148f:5572 Ralink Technology, Corp.
sharl@sharl-desktop:~$ ifconfig -a
eth0 Link encap:以太网 硬件地址 18:03:73:cc:86:50
UP BROADCAST MULTICAST MTU:1500 跃点数:1
接收数据包:0 错误:0 丢弃:0 过载:0 帧数:0
发送数据包:0 错误:0 丢弃:0 过载:0 载波:0
碰撞:0 发送队列长度:1000
接收字节:0 (0.0 B) 发送字节:0 (0.0 B)
中断:20 Memory:e1a00000-e1a20000

lo Link encap:本地环回
inet 地址:127.0.0.1 掩码:255.0.0.0
inet6 地址: ::1/128 Scope:Host
UP LOOPBACK RUNNING MTU:65536 跃点数:1
接收数据包:320 错误:0 丢弃:0 过载:0 帧数:0
发送数据包:320 错误:0 丢弃:0 过载:0 载波:0
碰撞:0 发送队列长度:0
接收字节:25280 (25.2 KB) 发送字节:25280 (25.2 KB)


新内核:

sharl@sharl-desktop:~$ uname -a
Linux sharl-desktop 3.10.0-031000-generic #201306301935 SMP Sun Jun 30 23:36:16 UTC 2013 x86_64 x86_64 x86_64 GNU/Linux
sharl@sharl-desktop:~$ lsusb
Bus 001 Device 002: ID 8087:0024 Intel Corp. Integrated Rate Matching Hub
Bus 002 Device 002: ID 8087:0024 Intel Corp. Integrated Rate Matching Hub
Bus 001 Device 001: ID 1d6b:0002 Linux Foundation 2.0 root hub
Bus 002 Device 001: ID 1d6b:0002 Linux Foundation 2.0 root hub
Bus 002 Device 003: ID 05e3:0608 Genesys Logic, Inc. USB-2.0 4-Port HUB
Bus 002 Device 004: ID 0ac8:303b Z-Star Microelectronics Corp. ZC0303 Webcam
Bus 002 Device 005: ID 0bc2:3300 Seagate RSS LLC
Bus 002 Device 006: ID 046d:c52e Logitech, Inc.
Bus 002 Device 007: ID 062a:8668 Creative Labs
Bus 002 Device 008: ID 1a1d:8301 Veho
Bus 002 Device 009: ID 148f:5572 Ralink Technology, Corp.
sharl@sharl-desktop:~$ ifconfig
eth0 Link encap:以太网 硬件地址 18:03:73:cc:86:50
UP BROADCAST MULTICAST MTU:1500 跃点数:1
接收数据包:0 错误:0 丢弃:0 过载:0 帧数:0
发送数据包:0 错误:0 丢弃:0 过载:0 载波:0
碰撞:0 发送队列长度:1000
接收字节:0 (0.0 B) 发送字节:0 (0.0 B)
中断:20 Memory:e1a00000-e1a20000

lo Link encap:本地环回
inet 地址:127.0.0.1 掩码:255.0.0.0
inet6 地址: ::1/128 Scope:Host
UP LOOPBACK RUNNING MTU:65536 跃点数:1
接收数据包:140 错误:0 丢弃:0 过载:0 帧数:0
发送数据包:140 错误:0 丢弃:0 过载:0 载波:0
碰撞:0 发送队列长度:0
接收字节:10844 (10.8 KB) 发送字节:10844 (10.8 KB)

wlan0 Link encap:以太网 硬件地址 14:cf:92:0e:db:ff
inet 地址:192.168.0.4 广播:192.168.0.255 掩码:255.255.255.0
inet6 地址: fe80::16cf:92ff:fe0e:dbff/64 Scope:Link
UP BROADCAST RUNNING MULTICAST MTU:1500 跃点数:1
接收数据包:64 错误:0 丢弃:0 过载:0 帧数:0
发送数据包:113 错误:0 丢弃:0 过载:0 载波:0
碰撞:0 发送队列长度:1000
接收字节:16650 (16.6 KB) 发送字节:16987 (16.9 KB)

[ ] ( 6054 次浏览 ) 永久链接 ( 3 / 2552 )
VPS 折腾全记录-part 4 

好了,值得庆贺的是,本篇是这次中篇连载记录手稿的最后一集了。

:-)

太棒了。

现在就剩下 lighttpd 和 nginx 这两台 http server 了。

先是lighttpd,解压,进入目录:
我的configure:

[root@PowerPC lighttpd-1.4.32]# ./configure \
> --prefix=/opt/lighttpd \
> --disable-lfs \
> --disable-ipv6 \
> --with-mysql=/opt/mysql/bin/mysql_config \
> --with-attr \
> --with-pcre \
> --with-zlib \
> --with-bzip2 \
> --with-fam


检查依赖,没有任何问题。下面是编译程序给出的概况:

Plugins:

enabled:
mod_access
mod_accesslog
mod_alias
mod_auth
mod_cgi
mod_compress
mod_dirlisting
mod_evhost
mod_expire
mod_extforward
mod_fastcgi
mod_flv_streaming
mod_indexfile
mod_mysql_vhost
mod_proxy
mod_redirect
mod_rewrite
mod_rrdtool
mod_scgi
mod_secdownload
mod_setenv
mod_simple_vhost
mod_ssi
mod_staticfile
mod_status
mod_trigger_b4_dl
mod_userdir
mod_usertrack
mod_webdav
disabled:
mod_cml
mod_magnet

Features:

enabled:
auth-crypt
compress-bzip2
compress-deflate
compress-gzip
regex-conditionals
stat-cache-fam
disabled:
auth-ldap
large-files
network-ipv6
network-openssl
storage-gdbm
storage-memcache
webdav-locks
webdav-properties


确认没有问题后,开始编译,安装。

之后,恢复配置文件。下面问题来了。

尝试启动 lighttpd,出错。

2013-04-23 17:15:11: (plugin.c.169) dlopen() failed for: /opt/lighttpd/lib/mod_mysql_vhost.so libmysqlclient.so.18: cannot open shared object file: No such file or directory
2013-04-23 17:15:11: (server.c.676) loading plugins finally failed


提示找不到mysql 的动态链接库。为啥?因为没有在系统里面注册。因为这次的包括mysql 在内的所有软件都没有使用传统的 /usr/local/ 路径,所以各自.so 文件所在的目录路径,系统自然不知道。
解决方案:
编辑位于 /etc 下的ld.so.conf 文件,加入各自的lib 目录路径。
我的ld.so.conf:

[root@PowerPC src]# cat /etc/ld.so.conf
include ld.so.conf.d/*.conf
/usr/local/lib
/usr/local/libevent/lib
/opt/lighttpd/lib
/opt/mysql/lib


保存之后,ldconfig -v,刷新所有库。
注:这里说点题外话,关于动态链接库的添加,有人建议就像BIN $PATH 一样,追加到系统的 $LD_LIBRARY_PATH 变量里,我个人是不建议这么做的。

再次运行 lighttpd,果然没有问题了。

打印出lighttpd 的版本信息:

[root@PowerPC ~]# lighttpd -V
lighttpd/1.4.32 - a light and fast webserver
Build-Date: Apr 23 2013 16:12:29

Event Handlers:

+ select (generic)
+ poll (Unix)
- rt-signals (Linux 2.4+)
+ epoll (Linux 2.6)
- /dev/poll (Solaris)
- eventports (Solaris)
- kqueue (FreeBSD)
- libev (generic)

Network handler:

+ linux-sendfile
- freebsd-sendfile
- solaris-sendfilev
+ writev
+ write
- mmap support

Features:

- IPv6 support
+ zlib support
+ bzip2 support
+ crypt support
- SSL Support
+ PCRE support
+ mySQL support
- LDAP support
- memcached support
+ FAM support
- LUA support
- xml support
- SQLite support
- GDBM support


搞定了lighttpd,接下来就是 nginx 了,这是剩下的最后一个了。

解压源码,进入源码主目录,
我的configure:

[root@PowerPC nginx-1.3.16]# ./configure \
> --prefix=/opt/nginx \
> --sbin-path=/opt/nginx/sbin/nginx \
> --conf-path=/opt/nginx/etc/nginx.conf \
> --error-log-path=/opt/nginx/var/error.log \
> --pid-path=/opt/nginx/var/nginx.pid \
> --lock-path=/opt/nginx/var/nginx.lock \
> --user=http \
> --group=web \
> --with-poll_module \
> --with-file-aio \
> --with-http_spdy_module \
> --with-http_realip_module \
> --with-http_addition_module \
> --with-http_image_filter_module \
> --with-http_flv_module \
> --with-http_mp4_module \
> --with-http_gunzip_module \
> --with-http_gzip_static_module \
> --without-http_fastcgi_module \
> --without-http_uwsgi_module \
> --without-http_scgi_module \
> --http-log-path=/opt/nginx/var/access.log \
> --http-client-body-temp-path=/tmp/nginx/request \
> --http-proxy-temp-path=/tmp/nginx/proxy \
> --without-mail_pop3_module \
> --without-mail_imap_module \
> --without-mail_smtp_module


检查依赖,一次通过。同样,和lighttpd 一样,编译程序给出了编译概况,见下:

Configuration summary
+ using system PCRE library
+ OpenSSL library is not used
+ md5: using system crypto library
+ sha1: using system crypto library
+ using system zlib library

nginx path prefix: "/opt/nginx"
nginx binary file: "/opt/nginx/sbin/nginx"
nginx configuration prefix: "/opt/nginx/etc"
nginx configuration file: "/opt/nginx/etc/nginx.conf"
nginx pid file: "/opt/nginx/var/nginx.pid"
nginx error log file: "/opt/nginx/var/error.log"
nginx http access log file: "/opt/nginx/var/access.log"
nginx http client request body temporary files: "/tmp/nginx/request"
nginx http proxy temporary files: "/tmp/nginx/proxy"


确认没有问题,make && make install 开始编译和安装。
一切都很顺利。在最后别忘了恢复下配置文件。
主要就是个 nginx.conf 文件。

好了,至此,这次的VPS升级、折腾手记全文完。

谢谢观赏。:)

_全剧终_
[ ] ( 3648 次浏览 ) 永久链接 ( 3 / 2761 )
VPS 折腾全记录-part 3 

接上。

搞完了底层基础(db 和 runtime),还是搞上层软件(ftp 、http 、cache server).

先是vsftpd,解压,进入目录:
首先编辑 builddefs.h,选择一些特性(如tcp wrapper)的开与关。

接下来直接make 编译,一般来讲几乎不会有问题,如果出错,那就是bug.

编译完成,安装。

[root@PowerPC vsftpd-3.0.2]# make install
if [ -x /usr/local/sbin ]; then \
install -m 755 vsftpd /usr/local/sbin/vsftpd; \
else \
install -m 755 vsftpd /usr/sbin/vsftpd; fi
if [ -x /usr/local/man ]; then \
install -m 644 vsftpd.8 /usr/local/man/man8/vsftpd.8; \
install -m 644 vsftpd.conf.5 /usr/local/man/man5/vsftpd.conf.5; \
elif [ -x /usr/share/man ]; then \
install -m 644 vsftpd.8 /usr/share/man/man8/vsftpd.8; \
install -m 644 vsftpd.conf.5 /usr/share/man/man5/vsftpd.conf.5; \
else \
install -m 644 vsftpd.8 /usr/man/man8/vsftpd.8; \
install -m 644 vsftpd.conf.5 /usr/man/man5/vsftpd.conf.5; fi
if [ -x /etc/xinetd.d ]; then \
install -m 644 xinetd.d/vsftpd /etc/xinetd.d/vsftpd; fi


就是一些启动脚本,执行主程序文件,手册。如果不使用 make install ,也可以手动复制。

接下来就是恢复配置文件 vsftpd.conf.

按说,因为我的vsftpd 是用pam_mysql 认证去做虚拟用户管理。本来我是打算重新编译一个pam_mysql.so 的,因为平时,每次,只要我安装了新的mysql 后都会这么做,因为之前的适用于之前版本的pam_mysql.so 不能用了。

可是,这次,很惊奇的是,给 mysql 5.6.8 的pam_mysql.so 居然可以用,呵呵。这倒给我省事了。

然而,问题还是有的。当我启动了vsftpd 后,我发现我的用户登录后出现了一个500错误:

vsftpd: refusing to run with writable root inside chroot()


经查,这是新版本的vsftpd 的一个新特性,及不允许虚拟用户的主根目录具有可写权限。

庆幸的是,这是可以关闭的。我在这里这里找到了答案。
参见:http://askubuntu.com/questions/239239/ubuntu-12-04-500-oops-vsftpd-refusing-to-run-with-writable-root-inside-chroot

修改后 vsftpd.conf 就像这样:

[root@PowerPC ~]# cat /etc/vsftpd.conf | grep chroot
# You may specify an explicit list of local users to chroot() to their home
# directory. If chroot_local_user is YES, then this list becomes a list of
# users to NOT chroot().
chroot_local_user=NO
chroot_list_enable=YES
chroot_list_file=/etc/vsftpd/ftpusers
allow_writeable_chroot=YES


请注意最后一行,是它禁用了这一安全检查。

这下,vsftpd 又可以像从前一样自由登入登出了。

搞定了ftp 服务器,现在轮到代理、缓存服务器了。

一样,解压varnish源码包,进入根目录:
我的configure:

[root@PowerPC varnish-3.0.3]# ./configure \
> --prefix=/opt/varnish \
> --disable-largefile \
> --enable-epoll \
> --with-pcre-config=/usr/bin/pcre-config \
> --with-jemalloc


检查编译,通过,开始编译安装。

一切都很顺利。

最后,别忘了恢复配置文件 default.vcl.

好了,缓存服务器也搞定了。

未完待续。
[ ] ( 1896 次浏览 ) 永久链接 ( 3 / 2511 )

<< <上一页 | 6 | 7 | 8 | 9 | 10 | 11 | 12 | 13 | 14 | 15 | 下一页> >>