在Ubuntu 下安装Nvidia 显卡驱动 

前端时间进了一家公司,做起了网管。

新员工分配电脑的时候,我利用职务之便给自己找了一台配置还算不错的主机。

Asua 板子 + Intel Core i5 2.9Ghz + 8Gb 内存,其他不太清楚。

之后,我给电脑安装了系统,选的是Ubuntu 12.04 64bit 版本。

不过,很快我就发现了一个问题,那就是这台机器的显卡是独立的,是Nvidia Quadro 6000 的型号。

而Ubuntu 里并没有包含这些私有的驱动,我得去单独下载、安装它们。

首先,去Nvidia 的官网(http://www.nvidia.com/Download/index.aspx?lang=en-us) 查找并下载对应显卡型号的适用于我的系统的驱动。

一个 NVIDIA-Linux-x86_64-295.59.run 的二进制包,如下:


sharl@sharl-desktop:~/下载$ ls -hl | grep NVIDIA
-rwxrwxrwx 1 sharl sharl 56M 8月 1 14:22 NVIDIA-Linux-x86_64-295.59.run


之后开始安装。

1.ctrl + alt + f# 切入到tty终端,找到该驱动文件位置。
2.chmod a+ x *.run,赋予其Exec(可执行)权限。
3.service lightdm stop,干掉X.org.
4.sudo ./*.run,运行该BIN文件,开始安装驱动。

值得注意的是,安装驱动的过程中需要编译一些系统模块,所以可能会依赖一些库。

安装即可.
sudo apt-get install libc6-dev build-essentials.

驱动安装完成后,重启一下X.org 或者直接重启系统,就可以看到显卡驱动已经在发挥作用了。

注:Linux 下有点麻烦的事,驱动(包括显卡)安装好后,以后每次升级内核后,都需要重新安装一遍,这点需要注意。

还有就是,Nvidia 的显卡驱动在重新安装之前最好是先移除/卸载掉之前的旧驱动,

sudo ./*.run --uninstall 即可。

尽管安装程序它会自己卸载旧驱动,不过还是会有问题。

比如,你会发现桌面环境变成了Unity 2D,而不是之前的Unity 3D,很是让人不爽。

以上就是我在Linux 系统上第一次安装显卡驱动的心得,希望对各位有用。
[ ] ( 3515 次浏览 ) 永久链接 ( 3 / 2724 )
在Ubuntu 上通过ADB 调试Samsung Galaxy Tab Plus P6200 

三星的手机要我怎么说呢?简直就是废品。

自带的新浪天气的插件三天两头挂掉,让人苦不堪言。

我在网上一查,遇到这么情况我只是我一个,还有很多。

所以我决定今天通过ADB(Android Debug Bridge)查看下它的日志,看能不能发现点问题。

然后问题来了。

我发现我的电脑却总是不能识别出P6200,在设备一栏永远是未知,一串问号。

就像这样:

sharl@sharl-laptop:~$ adb devices
List of devices attached
???????????? device


而我的motorola 的里程碑手机从未遇到过这种情况,samsung 这个废品!

不过,骂归骂,问题总是要解决。

经过我的一番研究,终于找到了一个可行的步骤,现分享如下:

首先确认手机与电脑没有建立连接,各自独立。

再确认 adb 进程没有在跑,如果有,杀掉,如下:

sharl@sharl-laptop:~$ killall adb
adb:没有发现操作


紧接着,重启 udev 服务。如下:

sharl@sharl-laptop:~$ sudo service udev restart
udev stop/waiting
udev start/running, process 7632


这时候,打开手机,设置,开启USB调试模式,并用数据线连接至电脑。

之后,查看下USB设备,确认系统已经识别该设备。如下:

sharl@sharl-laptop:~$ lsusb
Bus 001 Device 001: ID 1d6b:0002 Linux Foundation 2.0 root hub
Bus 002 Device 001: ID 1d6b:0002 Linux Foundation 2.0 root hub
Bus 003 Device 001: ID 1d6b:0001 Linux Foundation 1.1 root hub
Bus 004 Device 001: ID 1d6b:0001 Linux Foundation 1.1 root hub
Bus 005 Device 001: ID 1d6b:0001 Linux Foundation 1.1 root hub
Bus 006 Device 001: ID 1d6b:0001 Linux Foundation 1.1 root hub
Bus 007 Device 001: ID 1d6b:0001 Linux Foundation 1.1 root hub
Bus 002 Device 002: ID 05e3:0608 Genesys Logic, Inc. USB-2.0 4-Port HUB
Bus 002 Device 004: ID 0bc2:3300 Seagate RSS LLC
Bus 005 Device 002: ID 08ff:2580 AuthenTec, Inc. AES2501 Fingerprint Sensor
Bus 002 Device 005: ID 062a:8668 Creative Labs
Bus 002 Device 006: ID 1a1d:8301 Veho
Bus 002 Device 067: ID 0ac8:303b Z-Star Microelectronics Corp. ZC0303 Webcam
Bus 002 Device 008: ID 046d:c52e Logitech, Inc.
Bus 002 Device 079: ID 04e8:6860 Samsung Electronics Co., Ltd GT-I9100 Phone [Galaxy S II]


注:最后一个就是我的P6200.

最后,启动adb 即可。

这样的步骤下来,就可以成功识别出samsung 的手机了。如下:

sharl@sharl-laptop:~$ adb devices
* daemon not running. starting it now on port 5037 *
* daemon started successfully *
List of devices attached
46411912F57398CE device


怎么样?再也不是之前的 “????????” 或者是 offline 了。

真尼玛不容易,我察!
[ ] ( 4142 次浏览 ) 永久链接 ( 3 / 2664 )
升级安装 varnish 3.0.3 RC1 和 lighttpd 1.4.31 以及 nginx 1.3.1 

最近我所用到的很多软件都更新了,Varnish Cache 几天前发布了其3.0.3的RC测试版,我有理由试用和反馈。

Lighttpd 也在上周发布了今年的第一个新版本,修复几个严重问题。

nginx 呢,也在昨天,发布了其1.3.x 分支的第二个测试版,修复了一个Windows 下的CVE.这在nginx 官网的安全通告页可以看到:
http://nginx.org/en/security_advisories.html

GNU/Linux 不受影响,不过还是有一些bugfix.具体见更新列表:
http://nginx.org/en/CHANGES

基于此,我决定挨个跟进。

下载源码:
7 wget http://repo.varnish-cache.org/test/varn ... rc1.tar.gz
8 wget http://download.lighttpd.net/lighttpd/r ... 31.tar.bz2
9 wget http://nginx.org/download/nginx-1.3.1.tar.gz

移除旧版本:
[root@PowerPC pub]# rm varnish*
rm: remove regular file `varnish-3.0.2.tar.gz'? y
rm: remove regular file `varnish-3.0.3-rc1.tar.gz'? n
[root@PowerPC pub]# rm lighttpd*
rm: remove regular file `lighttpd-1.4.30.tar.bz2'? y
rm: remove regular file `lighttpd-1.4.31.tar.bz2'? n
[root@PowerPC pub]# rm nginx*
rm: remove regular file `nginx-1.3.0.tar.gz'? y
rm: remove regular file `nginx-1.3.1.tar.gz'? n

挨个解压,列表如下:
[root@PowerPC ~]# ls -lh
total 12K
drwxr-sr-x 6 1000 1000 4.0K Jun 6 16:54 lighttpd-1.4.31
drwxr-xr-x 9 1001 1001 4.0K Jun 6 17:06 nginx-1.3.1
drwxr-xr-x 10 1000 1000 4.0K Jun 6 16:44 varnish-3.0.3-rc1

先从Varnish Cache开始,进入目录:
我的configure:
[root@PowerPC varnish-3.0.3-rc1]# ./configure \
> --prefix=/usr/local/varnish \
> --exec-prefix=/usr/local \
> --sysconfdir=/etc/sysconfig \
> --localstatedir=/var \
> --disable-largefile \
> --enable-kqueue \
> --enable-epoll \
> --enable-ports \
> --with-jemalloc

检查依赖,没有问题。只有一个函数的警告。

configure: WARNING: won't look for sendfile() on i686-pc-linux-gnu


忽略即可。make && make install 编译安装。
恢复配置文件,覆盖自动生成的default.vcl .

接下来 lighttpd,进入目录:
我的configure:
[root@PowerPC lighttpd-1.4.31]# ./configure \
> --prefix=/usr/local/lighttpd \
> --exec-prefix=/usr/local \
> --sysconfdir=/etc/sysconfig/lighttpd \
> --localstatedir=/var \
> --disable-lfs \
> --disable-ipv6 \
> --with-mysql=`which mysql_config` \
> --with-ldap \
> --with-attr \
> --with-pcre \
> --with-zlib \
> --with-bzip2

检查依赖,系统给出编译概况:

Plugins:

enabled:
mod_access
mod_accesslog
mod_alias
mod_auth
mod_cgi
mod_compress
mod_dirlisting
mod_evhost
mod_expire
mod_extforward
mod_fastcgi
mod_flv_streaming
mod_indexfile
mod_mysql_vhost
mod_proxy
mod_redirect
mod_rewrite
mod_rrdtool
mod_scgi
mod_secdownload
mod_setenv
mod_simple_vhost
mod_ssi
mod_staticfile
mod_status
mod_trigger_b4_dl
mod_userdir
mod_usertrack
mod_webdav
disabled:
mod_cml
mod_magnet

Features:

enabled:
auth-crypt
auth-ldap
compress-bzip2
compress-deflate
compress-gzip
regex-conditionals
disabled:
large-files
network-ipv6
network-openssl
stat-cache-fam
storage-gdbm
storage-memcache
webdav-locks
webdav-properties


确认没有问题。make && make install 以继续。
编译安装完成后,恢复下配置文件目录。

最后是 nginx,进入目录:
我的configure:
[root@PowerPC nginx-1.3.1]# ./configure \
> --prefix=/usr/local/nginx \
> --sbin-path=/usr/local/sbin/nginx \
> --conf-path=/etc/sysconfig/nginx/nginx.conf \
> --error-log-path=/var/log/nginx/error.log \
> --pid-path=/var/run/nginx.pid \
> --lock-path=/var/lock/nginx.lock \
> --user=web \
> --group=http \
> --with-rtsig_module \
> --with-select_module \
> --with-poll_module \
> --with-file-aio \
> --with-http_realip_module \
> --with-http_addition_module \
> --with-http_xslt_module \
> --with-http_image_filter_module \
> --with-http_flv_module \
> --with-http_mp4_module \
> --with-http_gzip_static_module \
> --without-http_ssi_module \
> --without-http_geo_module \
> --without-http_map_module \
> --without-http_rewrite_module \
> --without-http_proxy_module \
> --without-http_fastcgi_module \
> --without-http_uwsgi_module \
> --without-http_scgi_module \
> --without-http_limit_conn_module \
> --without-http_limit_req_module \
> --http-log-path=/var/log/nginx/access.log \
> --http-client-body-temp-path=/tmp/nginx/request \
> --without-mail_pop3_module \
> --without-mail_imap_module \
> --without-mail_smtp_module \
> --with-pcre

同样,检查依赖时系统会给出编译概况:

Configuration summary
+ using system PCRE library
+ OpenSSL library is not used
+ md5: using system crypto library
+ sha1: using system crypto library
+ using system zlib library

nginx path prefix: "/usr/local/nginx"
nginx binary file: "/usr/local/sbin/nginx"
nginx configuration prefix: "/etc/sysconfig/nginx"
nginx configuration file: "/etc/sysconfig/nginx/nginx.conf"
nginx pid file: "/var/run/nginx.pid"
nginx error log file: "/var/log/nginx/error.log"
nginx http access log file: "/var/log/nginx/access.log"
nginx http client request body temporary files: "/tmp/nginx/request"


同样,在确认无误后,开始 编译 和 安装。 make && make install.
之后,恢复配置文件,覆盖生成的 nginx.conf 文件。

注:这里有个小插曲,那就是我在编译nginx 时候,把user 和 group 参数写反了,以至于启动 nginx 后,提示“getpwnam() 和 getgrnam()” 错误。
我又难得再编译一遍,就用"user USER GROUP;"修饰符写死在配置文件里了。囧~

之后启动所有服务,一切正常。
升级结束。
[ ] ( 2180 次浏览 ) 永久链接 ( 2.9 / 2691 )
升级安装 Nginx 1.3.0 和 为PHP 安装启用 APC 模块 

昨天,nginx 发布了其最新开发分支1.3.x 的第一个版本 - 1.3.0。果断升级,并且按照它之前的路线图显示,1.3.x 分支很有可能要增加对 SPDY 的支持。

下载源码包:
36 wget http://nginx.org/download/nginx-1.3.0.tar.gz

移除旧版本:
[root@PowerPC pub]# rm nginx*
rm: remove regular file `nginx-1.2.0.tar.gz'? y
rm: remove regular file `nginx-1.3.0.tar.gz'? n

解压,进入目录:
我的configure :
[root@PowerPC nginx-1.3.0]# ./configure \
> --prefix=/usr/local/nginx \
> --sbin-path=/usr/local/sbin/nginx \
> --conf-path=/etc/sysconfig/nginx/nginx.conf \
> --error-log-path=/var/log/nginx/error.log \
> --pid-path=/var/run/nginx.pid \
> --lock-path=/var/lock/nginx.lock \
> --user=http \
> --group=web \
> --with-rtsig_module \
> --with-select_module \
> --with-poll_module \
> --with-file-aio \
> --with-http_image_filter_module \
> --with-http_flv_module \
> --with-http_mp4_module \
> --with-http_gzip_static_module \
> --without-http_ssi_module \
> --without-http_geo_module \
> --without-http_map_module \
> --without-http_rewrite_module \
> --without-http_proxy_module \
> --without-http_fastcgi_module \
> --without-http_uwsgi_module \
> --without-http_scgi_module \
> --http-log-path=/var/log/nginx/access.log \
> --http-client-body-temp-path=/tmp/nginx/request \
> --without-mail_pop3_module \
> --without-mail_imap_module \
> --without-mail_smtp_module \
> --with-pcre

检查依赖,没有问题。之后系统给出编译概况,如下:

Configuration summary
+ using system PCRE library
+ OpenSSL library is not used
+ md5: using system crypto library
+ sha1: using system crypto library
+ using system zlib library

nginx path prefix: "/usr/local/nginx"
nginx binary file: "/usr/local/sbin/nginx"
nginx configuration prefix: "/etc/sysconfig/nginx"
nginx configuration file: "/etc/sysconfig/nginx/nginx.conf"
nginx pid file: "/var/run/nginx.pid"
nginx error log file: "/var/log/nginx/error.log"
nginx http access log file: "/var/log/nginx/access.log"
nginx http client request body temporary files: "/tmp/nginx/request"


确认无误,make && make install.编译安装之。

之后,恢复配置文件即可.

nginx 升级完成。

接下来,考虑到我的PHP 5.4.0 一直都没有缓存模块,正好趁今天有时间一起搞定。

于是火速动手。

考虑到我以前一直用的eaccelerator,用的还蛮顺手的,故而还是用它。可是丫的已经很长时间没有更新了,SVN 的版本号永远的停留在了r427,最后更新2年前~

从SVN签出源码后,编译一下,居然报错。

奇怪,同样的版本,以前怎么没错?难道是不兼容PHP 5.4 + ?
果然,在它的sf.net 项目主页上,也看到了其他用户的反馈。
详见:http://sourceforge.net/projects/eaccelerator/reviews/

看来 eaccelerator 是指望不上了,好在还有 APC 和 Xcache 可选择。

最终还是选了APC (Alternative PHP Cache),毕竟是 PHP 团队自己在维护,信得过。

下载源码:
wget http://pecl.php.net/get/APC-3.1.10.tgz

解压,进入目录:
执行 phpize,生成 configure 等文件.

我的configure:
[root@PowerPC APC-3.1.10]# ./configure \
> --enable-apc \
> --enable-apc-memprotect \
> --with-php-config=/usr/local/bin/php-config

其实很简单,就是指明 php-config 的绝对路径即可。
之后,make 编译。

编译完成后,其实我要得apc.so 链接库文件已经生成了。
[root@PowerPC APC-3.1.10]# find . -name "*.so"
./.libs/apc.so
./modules/apc.so

直接可以把apc.so 复制到 php 的扩展文件夹下。
或者
通过 make install 安装至其目录。如下:
[root@PowerPC APC-3.1.10]# make install
Installing shared extensions: /usr/local/lib/php/extensions/no-debug-non-zts-20100525/
Installing header files: /usr/local/php/include/php/

最后,编辑 php.ini 配置文件。
加入类似以下的APC 配置项:
extension=apc.so
apc.enabled=1
apc.shm_size=50M
apc.ttl=7200
apc.user_ttl=7200
apc.enable_cli=0

更多参数选项可以参考源码包下INSTALL 文件。

接下来,只需要重启PHP-FPM,就可以载入APC了。

启动所有服务后,查看PHPINFO:
http://cgi.xiazhengxin.name/phpinfo.php

一切OK。
[ ] ( 2549 次浏览 ) 永久链接 ( 3 / 2744 )
在Ubuntu 12.04 上为Virtualbox 启用USB 设备支持 

虚拟机我一直在用,不是说离不开Windows,而是有些时候一些应用在Windows 下体验确实要好一点,比如 Tencent QQ.

最近我找到了我失踪久矣的10moons 左轮摄像头,那还是我在北京念书的时候,在中关村买的。当时花了我100块RMB。

找到后甚是感触,于是便打算给我的虚拟机里面的QQ用起来。

众所周知,VirtualBox 使用宿主机的USB设备需要安装扩展包。根据自己的vbox的版本,到vbox官网下载对应的扩展包。

比如我的vbox 是4.1.12的,对应扩展包地址是:
http://download.virtualbox.org/virtualb ... ox-extpack

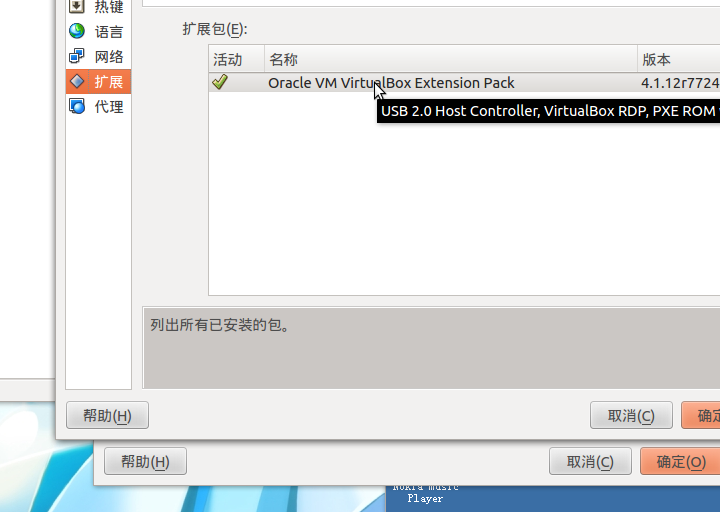
下载完毕后,在“管理”菜单下的“全局设定”里的“扩展”标签下,加入、启用即可。

如图:


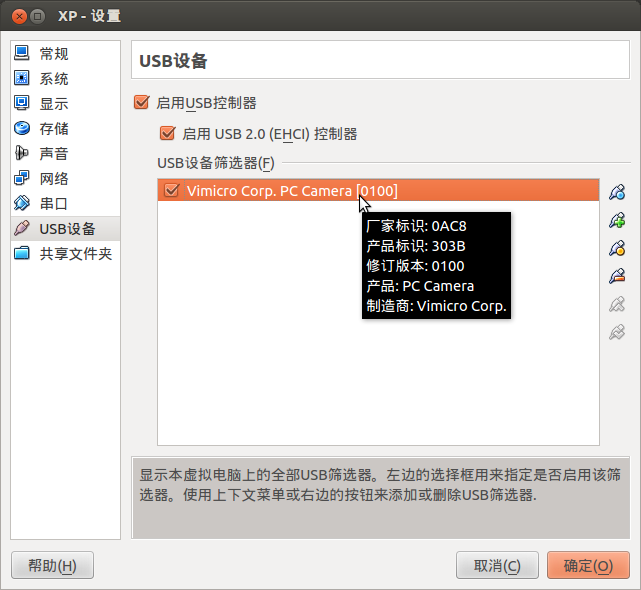
之后,打开虚拟系统设置,在“USB设备”标签下,勾选上"启用USB控制器"以及"2.0控制器"增加对USB2.0 的支持。

如图:


按说这个时候已经搞定了。可是在USB列表里面却没有任何USB设备。这是为什么呢?谷歌了一下,找到了一篇文章(具体地址已经无法回忆起来了,囧),解释了一下原因。

原来是vbox 所在的用户组比如要包括当前用户才行。

查看当前用户名:
sharl@sharl-laptop:~$ whoami
sharl

查看vbox 所在的组:
sharl@sharl-laptop:~$ cat /etc/group | grep vbox
vboxusers:x:125:sharl

将当前用户加入vbox组:
usermod -a -G vboxusers sharl

即可。

此时,重启系统。再次打开虚拟机,果然,USB设备都已经被识别、访问到了。
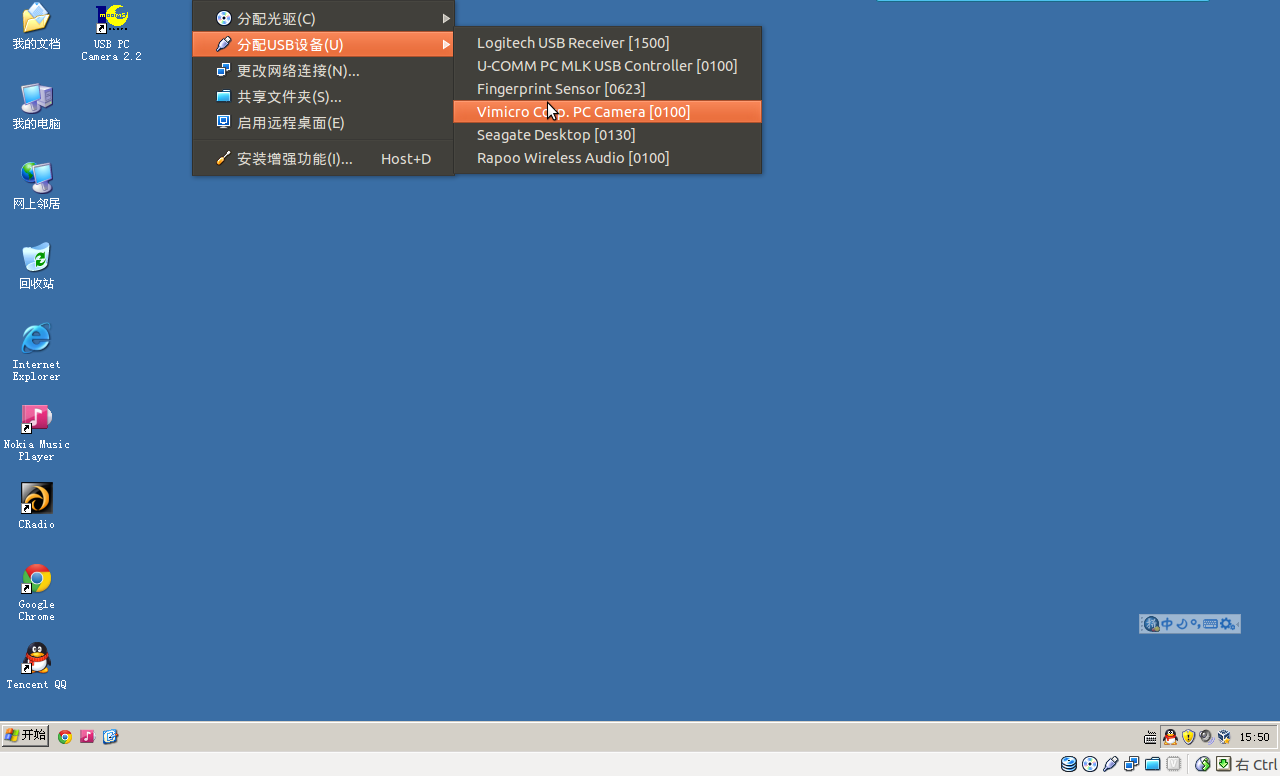
这些,在“设备”菜单下就可以看到。

如图:


添加后,虚拟机系统果然发现了新硬件,按照一般步骤,安装驱动即可正常使用。

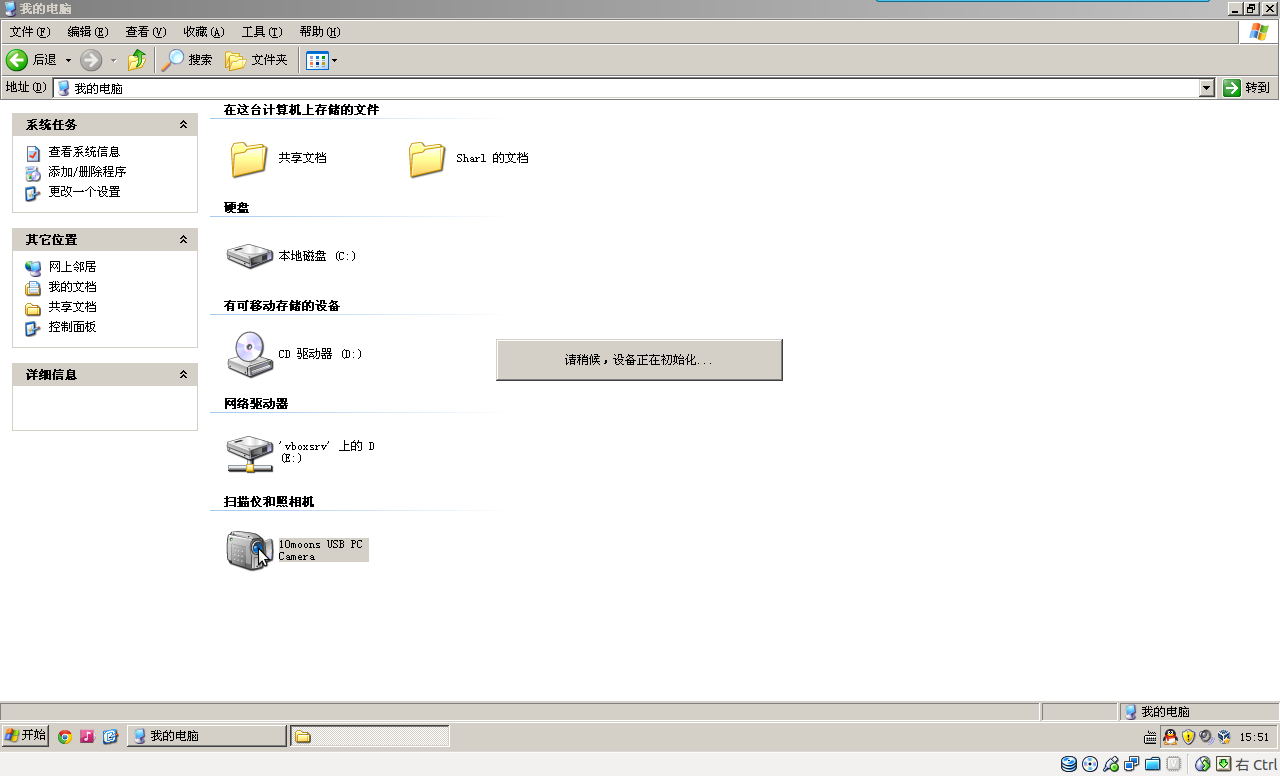
安装后的10moons 摄像头,果然很给力。

如图:


完。

注:本文在撰写和实践时参考了国外某网站一篇文章,由于记录不善,地址目前不详。模糊记得当时使用了“Ubuntu Virtualbox add usb device” 等关键词。
[ ] ( 2381 次浏览 ) 永久链接 ( 3 / 2826 )

<< <上一页 | 7 | 8 | 9 | 10 | 11 | 12 | 13 | 14 | 15 | 16 | 下一页> >>